
Overview
- This article will guide how to use Microsoft Booking.
What is Microsoft Booking ?
- Microsoft Bookings is an online and mobile application for small businesses that provide services to customers on an appointment basis. Examples of businesses include hair salons, dental offices, spas, law firms, financial services providers, consultants and auto shops.
How to use ?
- Like all Office 365 apps, Bookings is a box in the app launcher. Click the box to launch the application.
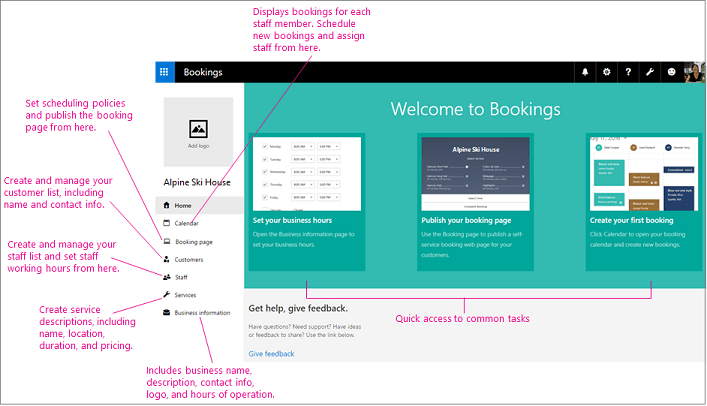
- The first time you open it, you’ll see the home page, including left navigation and three highlighted boxes that guide you in setting up and presenting Bookings’ standout features.
Step 1: Enter your business information
Provide business name and contact information
In Microsoft Bookings, the business information page contains all the details you usually find on the “About us” page of the business. These details include your business name, address, phone number, website URL, logo and hours of operation.
The information you provide here will be displayed on the page the customer uses to book an appointment (called the booking page) and in messages and reminders sent to them by Bookings.
- Select Business information.
- Enter your business name, address and phone number.
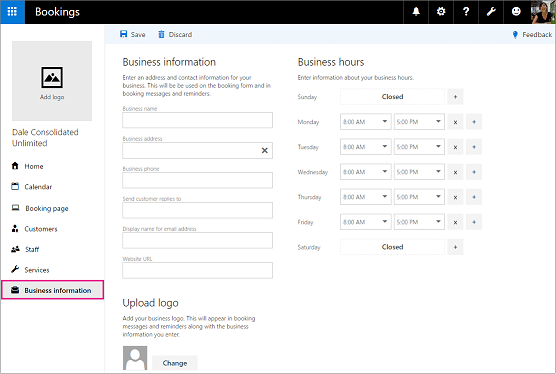
- In Send customer replies to, enter the email address you want to share with the customer on your booking page and where the reply to confirm the reservation and the reminder must be forwarded.
- In the Display name for email address, the display name for the email address, enter a friendly name that will be displayed to customers instead of the email address. For example, instead of viewing seanc@contoso.com, customers may see “Contact Contoso”.
- In Website URL, enter the homepage URL for your business. Select Save.
Upload your company logo
If you have not already uploaded your business logo to the Bookings app, you can do so from the Business Information page.
- On the Business information page, under the Upload icon, click Change.
- Select Upload photo. Then select Save.
Set your working hours
By default, working hours in the Bookngs app are set from 8am to 5pm, and from Monday to Friday. On the Business Information page, in Business hours, use the drop-down menu to select a start and end time for each day.
Click (+) to add a start and end time selector. Here’s how to set a time for a shift shift:
You may need to block the hours of each day or week to have staff meetings, update ads or take care of other business details. During these times, you may not want to schedule client appointments. Bookings application allows that.
Let’s say you have staff meetings every Thursday from 1 to 2:30 and want to block that time so all your employees can attend. Here is what you do:
- On the Business Information page, during business hours, select the start time and end time for Thursday. In this example, we’ll set 8h to 13h.
- Select (+) to create new rows for Thursday.
- In the new row, choose 14:30. Give start time and 18h for end time.
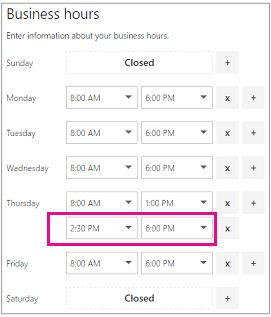
- Select Save. When customers visit your booking page, they will see that your business is closed from 13h to 14h30 on Thursdays.
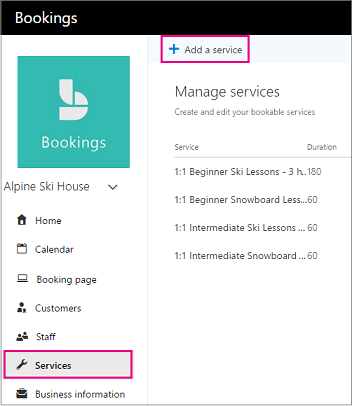
Step 2: Identify your services in Microsoft Bookings
Create service details
- Select Services > Add a service.
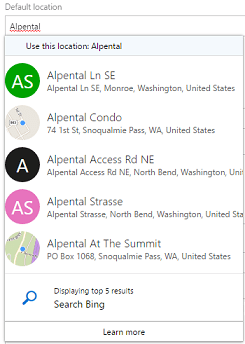
- Enter service details including name, description and location. When you start typing the address in the Default location, Bing will suggest the location for you.
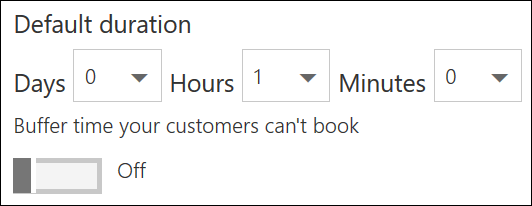
- Enter the amount of time needed for the service. You can enter the time you want to extend the day, home and minute and set the buffer time when customers cannot set.
- Choose price model. For Fixed price, Starting at, and Hourly, you will be asked to specify a price.
- In Price and payments, set the default price for the service. Then enter additional note information and reminders.
- Select Save.
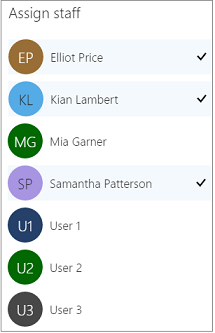
Assign an employee to the service
When assigning employees, think about whether the service requires special training or special certification. If so, only assign employees to play that role. If the employee you want to assign is not on the list, you will have to visit the Staff page to add them.
On the Services page, select the qualified employees to provide this service. You can choose one or more. Selected employees have a check mark next to their name. Continue, select Save.
Set your publishing and scheduling policy options
By default, the employee’s service and task details will be posted to your Bookings as soon as you select Save. In addition, the scheduling policies you set will be applied by default to the service you have created. If you do not want to accept these default values, follow these steps:
- On the service page, under Publishing options, clear the checkboxes next to Show this service on the booking page and / or Use the default scheduling policy.
- Set a scheduling policy for this service. Select Save.
you have got a fantastic blog here! would you prefer to make some invite posts on my weblog?