Purpose of the article
- This article describe how to set up SSL VPN connection between two Sophos Firewall. Through this article, you will learn how to configure SSL VPN Server, setup and connect with SSL VPN client.
Network Diagram and Scenario

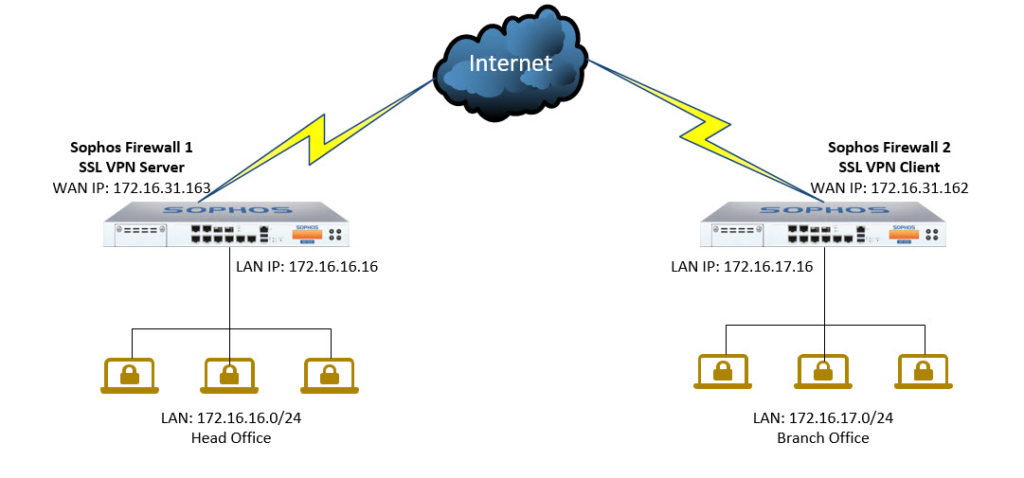
- According to the diagram we have two Sophos Firewall 1 and Sophos Firewall 2 devices, we will configure SSL VPN Site-to-Site with Sophos Firewall as a SSL VPN Server and Sophos Firewall 2 as a SSL VPN Client.
- Configuring SSL VPN will help users in the LAN area of two Sophos XG firewall devices to communicate with each other.
Configuring SSL VPN Server on Sophos Firewall 1
Add local and remote LAN
- Go to Hosts and Services > IP Host and click Add to create local LAN.

- Go to Hosts and Services > IP Host and click Add to create remote LAN.

Create SSL VPN Site-to-Site connection
Go to VPN > SSL VPN[Site-to-Site] and click Add under Server heading.
- Connection Name: The logical name for the tunnel, this will be the name of the tunnel created.
- Description: A detailed description about the server. (Example: The Washington server for the Washington-Dallas Tunnel)
- Use static virtual IP address: Use this if a dynamic physical IP address is being used. Configure it to an IP address that will not conflict with other hosts such as a private IP address. (example: 192.168.254.254)
- Local Networks: Select local hosts/networks to be given routed through the tunnel. (example: SF1_LAN)
- Remote Networks: Select the hosts/networks that will be accessed on the remote Sophos Firewall through the tunnel. (example: SF2_LAN)

- Click Save and the connection has been created, click the download icon on the right side of the connection just created.

- A pop-up window will appear. Click the download button to download the file that will be used to configure the client system. It will download a file in .apc format. You can enter the password to encrypt the file, if needed.

Add a firewall rule allow inbound and outbound SSL VPN traffic
- Go to Firewall > +Add Firewal Rule and select User/Network rule.

Configuring SSL VPN Client on Sophos Firewall 2
Create SSL VPN Client connection
Go to VPN > SSL VPN[Site-to-Site] and click Add under Client heading.
- Connection Name: The logical name for the tunnel, this will be the name of the tunnel created. (Example: Washington_Dallas_Client).
- Description: A detailed description about the server. (Example: The Dallas client for the Washington-Dallas Tunnel)
- Configuration File: Click on the Choose File button to browse for the file that was downloaded from the SSL VPN Server.
- Password: If the file is password encrypted then supply the password here.
- Use HTTP proxy server: Use this option if there is an upstream web proxy. This will allow the tunnel to connect through the proxy. This is usually left blank
- Override peer hostname: Use this if the hostname on the server side is not publicly routable by entering a DNS or public IP entry. This is usually left blank.

Add a firewall rule allow inbound and outbound SSL VPN traffic
- Go to Firewall > +Add Firewall Rule and select User/Network Rule.

Result
- The SSL tunnel VPN works when the status is displayed in green. If the status is shown in red, this indicates that the tunnel is not set and you should review your settings.
- You will also see traffic through SSL VPN connection.
Do the same goes with all the VPNs like i m using purevpn mac vpn https://www.purevpn.com/download/mac-vpn so will it be the same setting?
I think yes! They built multiple server VPN in different countries and coding application to user use their VPN system.
What if we had multiple subnets in each office and we want all subnets to communicate , how can that be accomplished.
Hello Sireesha, your question is very good. To all subnets to communicate, when we set up SSL VPN Site-to-Site, in Remote Network, we just need to add all of subnet that we have.