
1. Mục đích bài viết
- This article will guide in detail the configuration of the Palo Alto Networks firewall device to allow users within the LAN to access over the Internet..
2. Network diagram, configuration situation and steps to be taken.
2.1 Network digram :
2.2 Detailed network diagram :
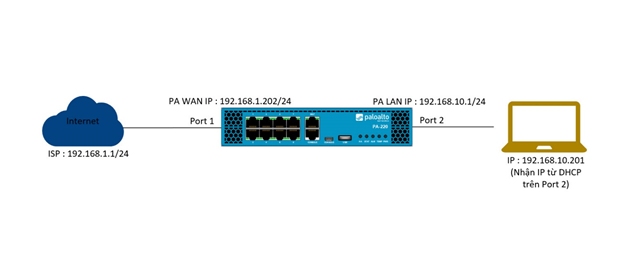
- As the diagram, the Palo Alto firewall device will be connected to the internet in port 1 with a static IP of 192.168.1.202/24 and point to the gateway that is the address of the network 192.168.1.1/24.
- On the inside of Palo Alto is the intranet layer with IP 192.168.10.1/24 set to port 2. On port 2 is configured DHCP server to allocate IP for devices accessing it.
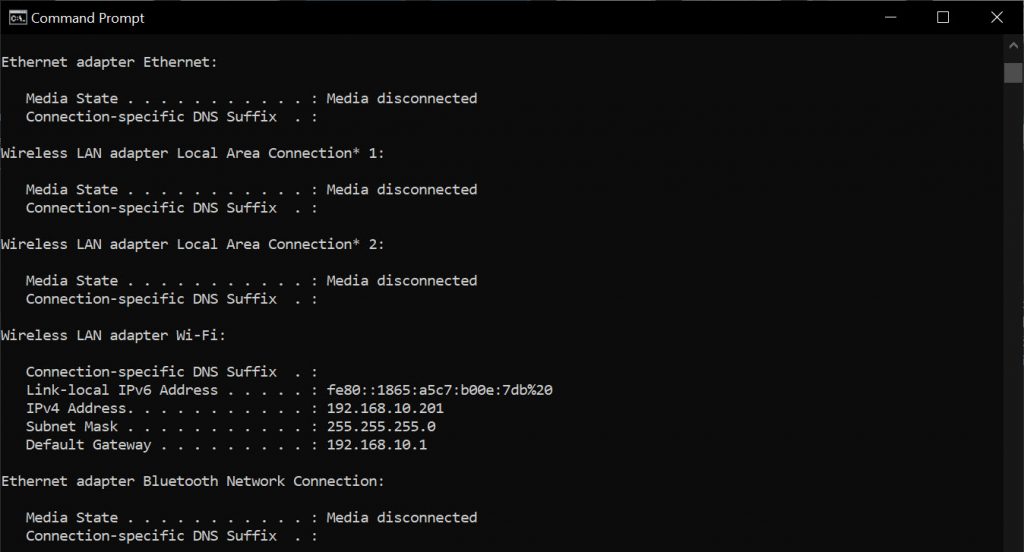
- Finally, a Laptop device is connected to port 2 via a network cable and receives IP 192.168.10.201 from the DHCP server on port 2.
2.3 Configuration steps :
- Connect to the admin site of the firewall device.
- Create zone.
- Create Interface Mgmt Profile.
- Network port configuration.
- Create Virtual Router.
- DHCP Server configuration.
- Create NAT policy.
- Create Security Policy Rule.
- Result
3. Configuration guide.
3.1 Connect to the admin site of the firewall device .
- We will connect to the firewall administration page using a network cable connecting the computer to the MGMT port of the Palo Alto firewall.
- Open the browser and access by the link https://192.168.1.1. The default account and password for the Palo Alto firewall are admin – admin.
3.2 Create zone
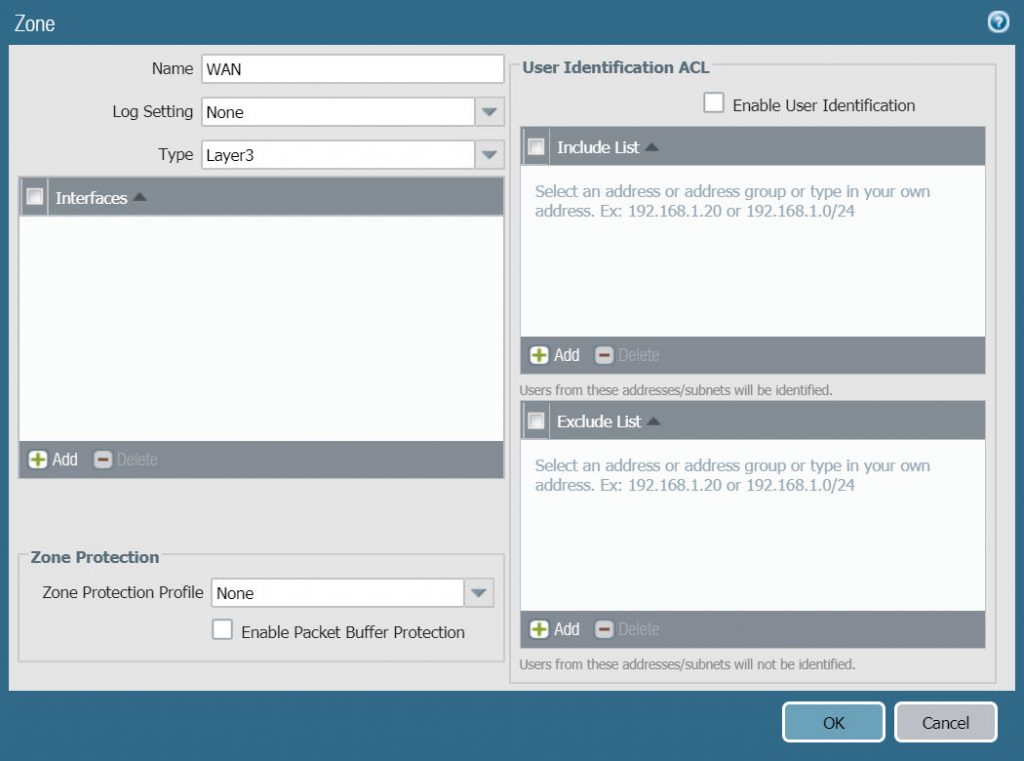
- We will create two zones, WAN and LAN.
- To create a WAN zone go to Network > Zones > click Add, enter the following information :
- Name : WAN
- Type : Layer 3
- Click OK to save.
- Similarly click Add to create a LAN zone with the following parameters :
- Name : LAN
- Type : Layer 3
- Click OK to save.

3.3 Create Interface Mgmt File
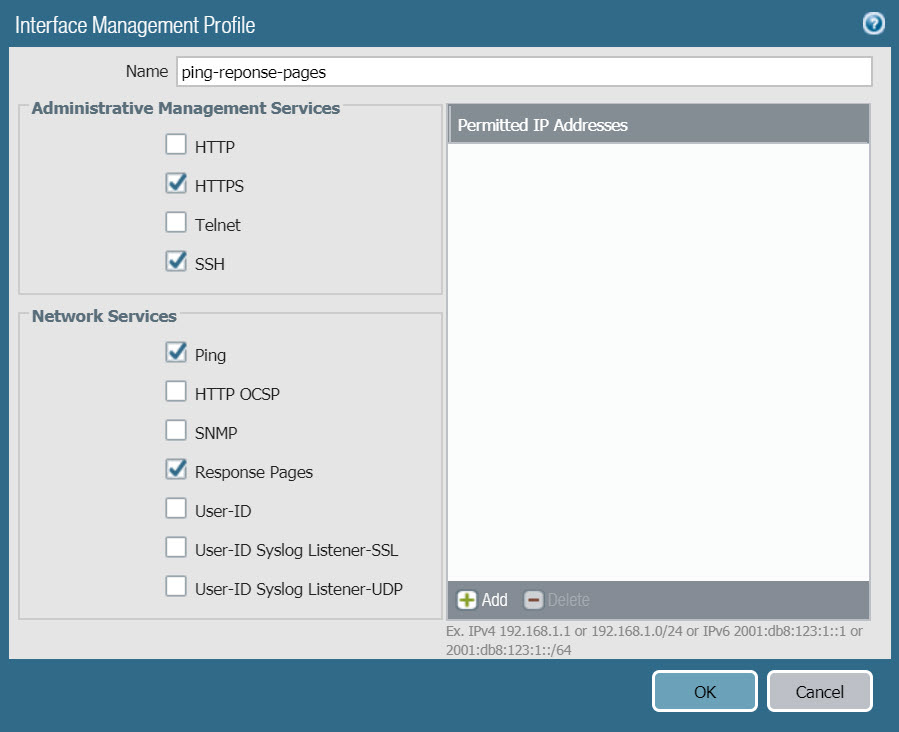
- The purpose of creating Interface Mgmt profile is to open some essential services for any network port such as HTTPS, Ping …
- Here we will create an Interface Mgmt Profile that allows HTTPS, Ping, SSH, Reponse Pages services for 1/2 ethernet LAN port so we can ping, access the admin site on this port without connecting by Mgmt port.
- To create Interface Mgmt Profile go to Network> Interface Mgmt> click Add and enter the following parameters :
- Name : ping-reponse-pages
- Administrative Management Services : select HTTPS, SSH.
- Network Services : select ping và reponse pages.
- Click OK to save.
3.4 Network port configuration
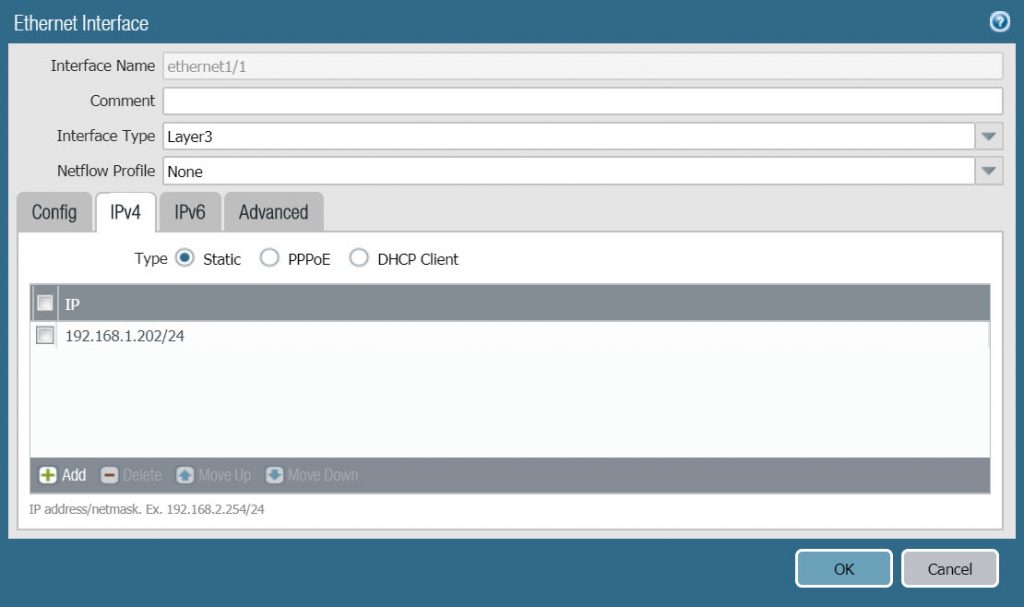
- To configure ethernet1/1 network port go to Network > Interfaces > click on the network port name.
- In the Config tab, configure the following parameters :
- Interface type : select Layer 3
- Security Zone : select WAN

- In the IPv4 tab, configure according to the following parameters :
- Type : select Static
- Click Add và type IP address 192.168.1.202/24.
- Click OK to save.
- Similar to ethernet1/1 port, to configure ethernet1/2 port click on the port name.
- In the Config tab, configure according to the following parameters :
- Interface Type : Layer 3
- Security Zone : LAN
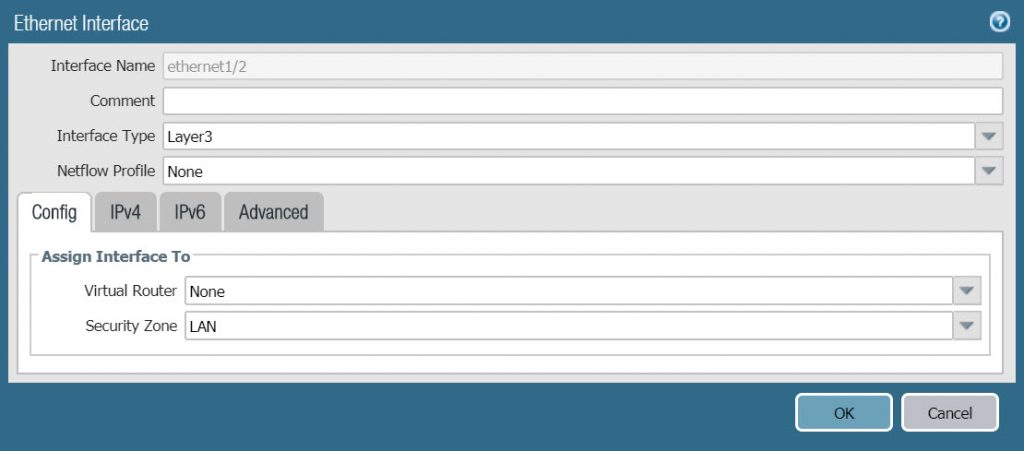
- In the IPv4 tab, we configure the following parameters :
- Type : Static
- Click Add và type IP 192.168.10.1/24

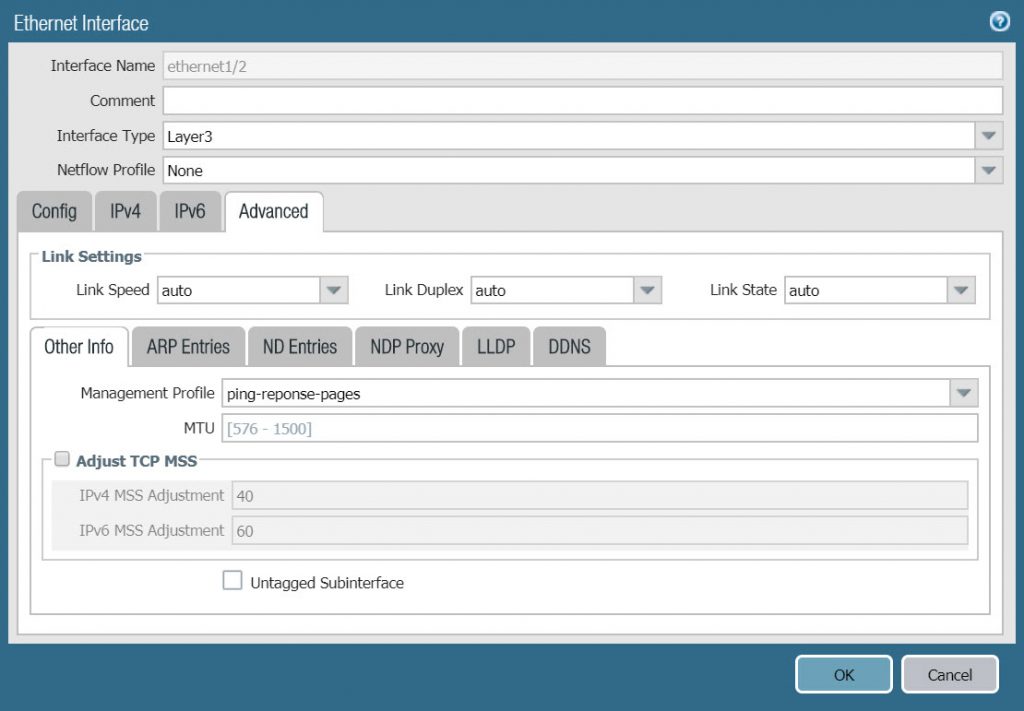
- In the Advanced tab, configure the following :
- In Other Info > Management Profile select the ping-reponse-pages we just created in the previous section.
3.5 Create Virtual Router
- To create a Virtual Router go to Network > Virtual Router > Click Add.
- In the Router Settings tab, configure according to the following parameters :
- Name : VR1
- In the General panel, click Add and add 2 port ethernet1/1 and Ethernet1/2.

- On the Static Routes tab, click Add and configure according to the following parameters :
- Name : default-route
- Destination : 0.0.0.0/0
- Interface : ethernet1/1
- Next Hop : IP Address and enter 192.168.1.1 in the box below.
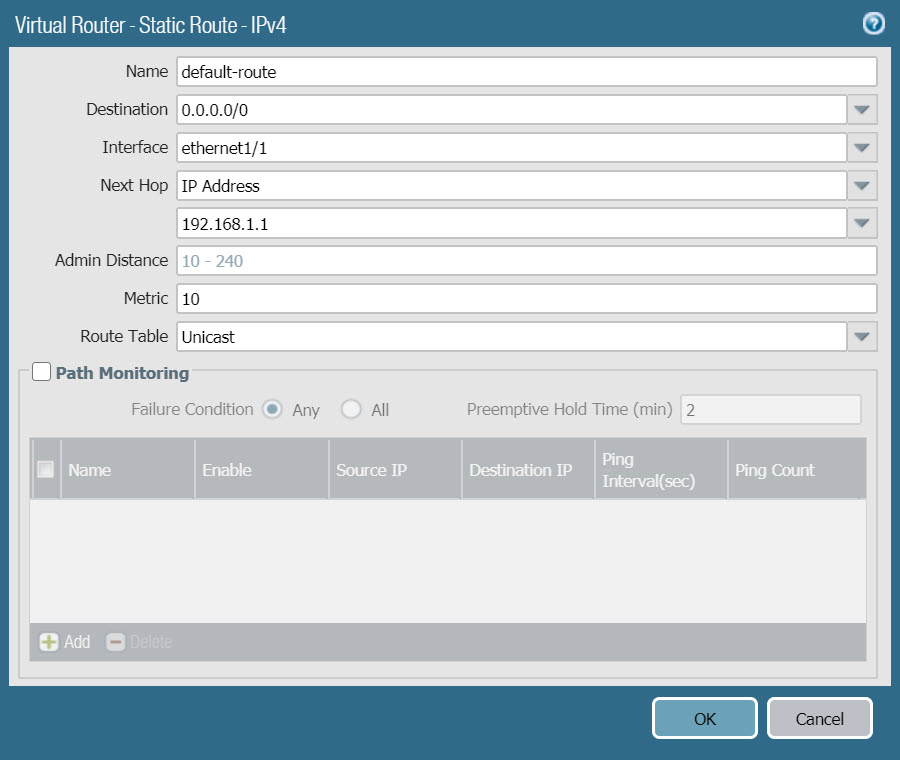
- Click OK two time to save.
3.6 DHCP Server configuration
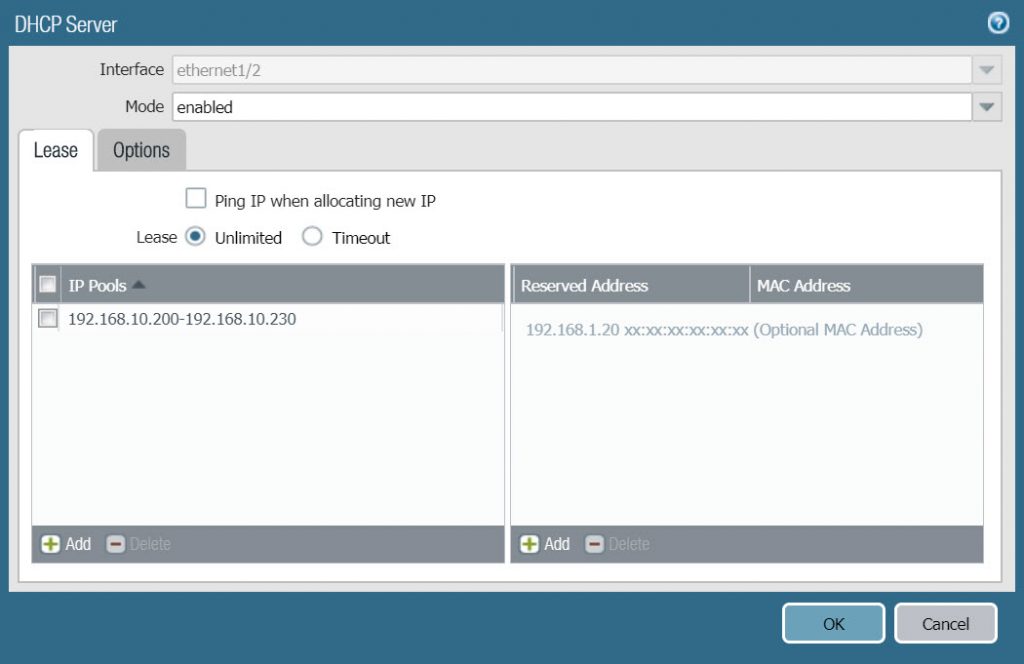
- To configure DHCP Server go to Network > DHCP > click Add.
- In the Lease tab, configure with the following parameters :
- Interface : select ethernet1/2
- Mode : enable
- In the IP Pools table click Add and fill in the IP range that will be allocated as 192.168.10.200-192.168.10.230.
- In the Options tab, configure with the following parameters :
- Gateway : 192.168.10.1
- Subnet Mask : 255.255.255.0
- Primary DNS : 8.8.8.8
- Secondary DNS : 8.8.4.4
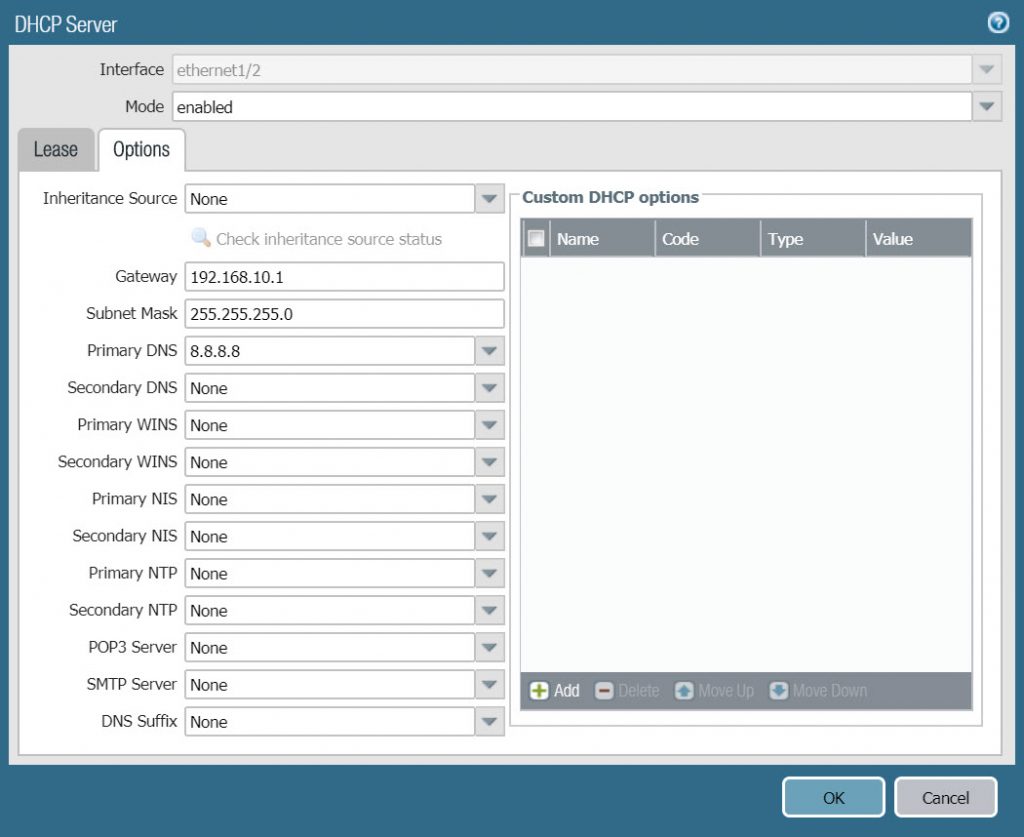
- Click OK to save.
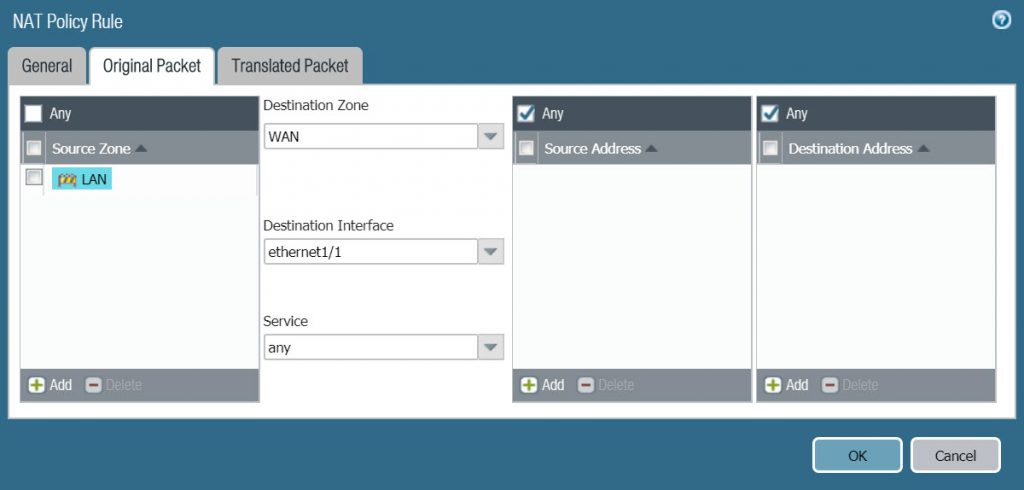
3.7 Create NAT Policy
- To create NAT Policy go to Policies > NAT > Click Add.
- In the General tab, configure according to the following parameters :
- Name : LAN_TO_WAN
- NAT Type : ipv4

- In the Original Packet tab, configure according to the following parameters :
- Source Zone : LAN
- Destination Zone : WAN
- Destination Interface : ethernet 1/1
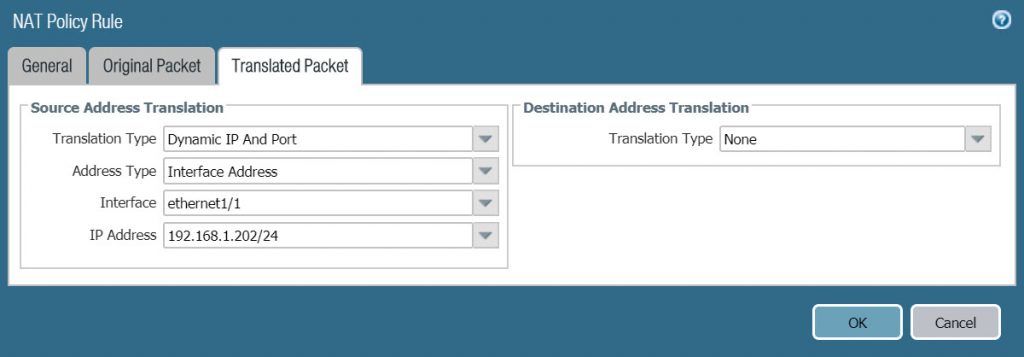
- In the Translated Packet tab > Source Address Translation, configure the following parameters :
- Translation Type : Dynamic IP and Port
- Address Type : Interface Address
- Interface : ethernet1/1
- IP Address : 192.168.1.202/24 (Note that this location must be selected from the drop down list, not entered manually)
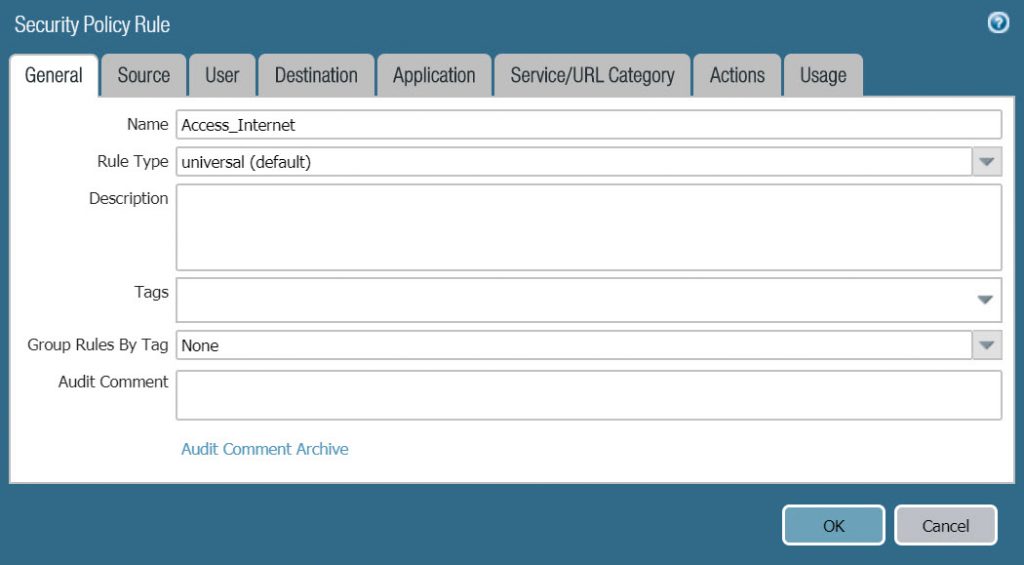
3.8 Create Security Policy Rule
- To create Policies > Security > Click Add.
- In the General tab, configure according to the following parameters :
- Name : Access_Internet
- Rule Type : universal (default)
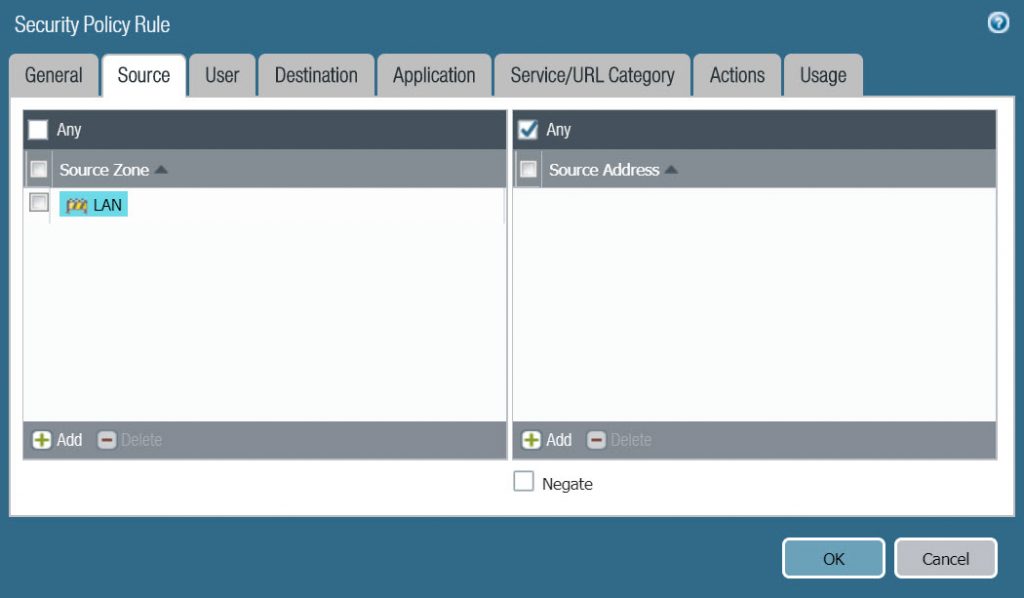
- On the Source tab, select LAN in Source Zone.
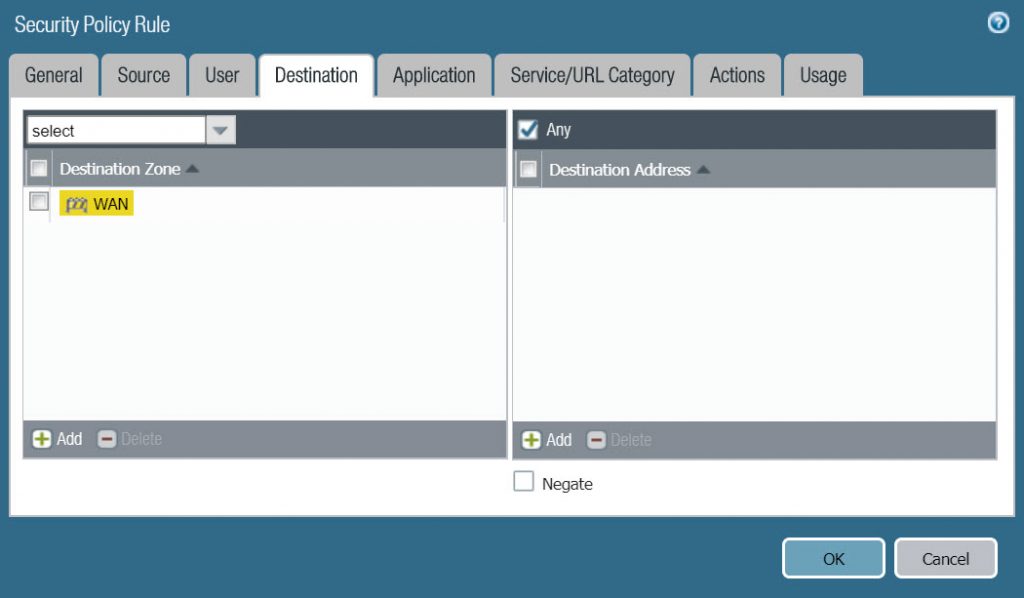
- On the Destination tab, choose WAN in Destinatoin Zone.
- On the Application tab, select Any.

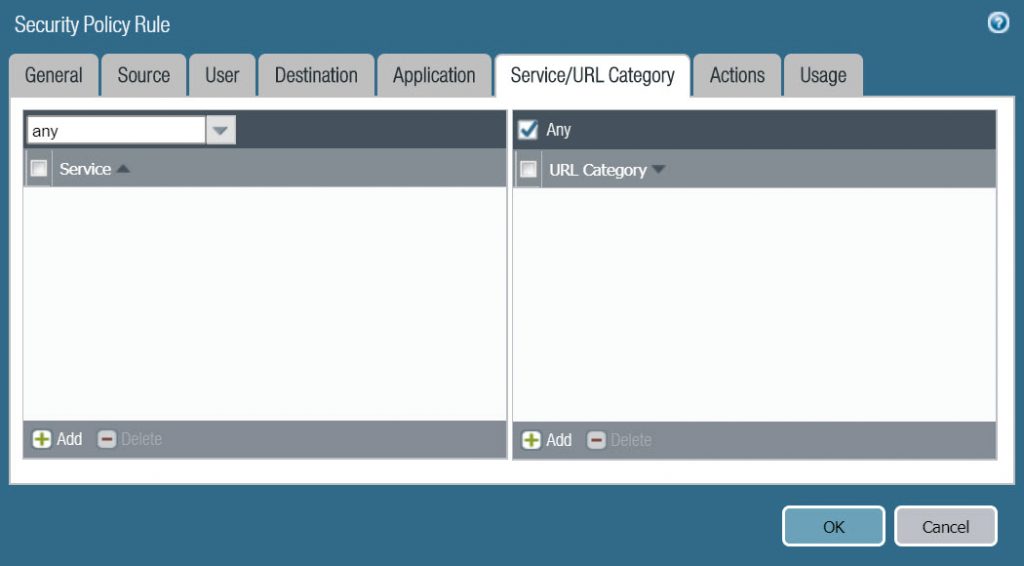
- On the Service / URL Category tab, select any.
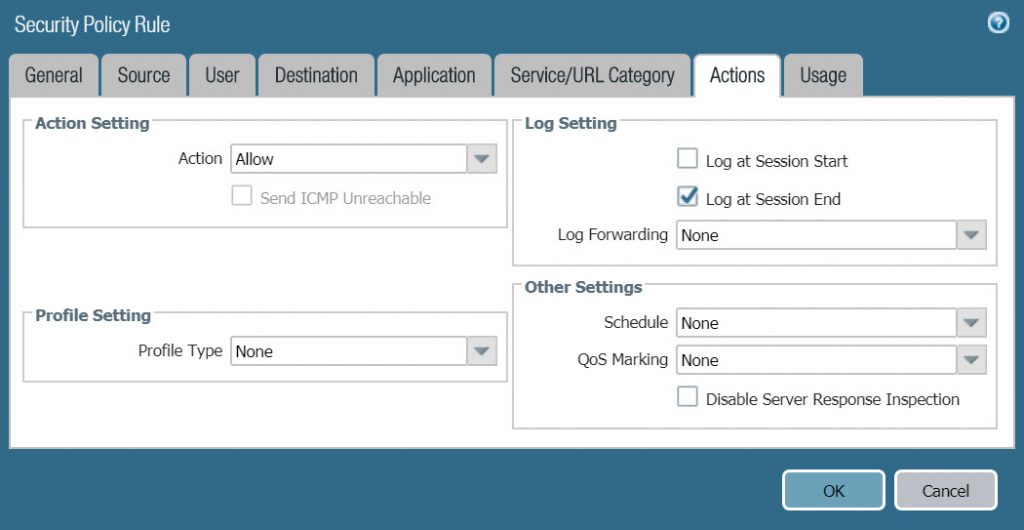
- In the Action tab, configure the following :
- Action Setting : Allow
- Log Setting : Log at Session End.
- Click OK to save.
3.9 Result
- After completing the configuration, use a network cable that connects the computer to the ethernet1/2 port on the Palo Alto firewall.
- Turn on the Command Line application and type the command ipconfig to check if the machine receives IP from the DHCP Server configured on ethernet1/2 port or not..
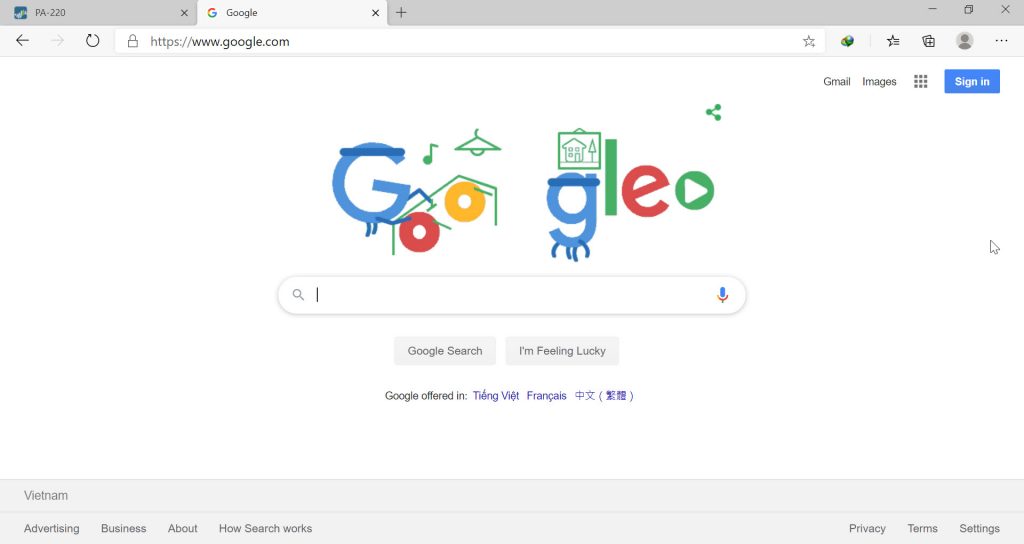
- Open a browser and try to access the google page.
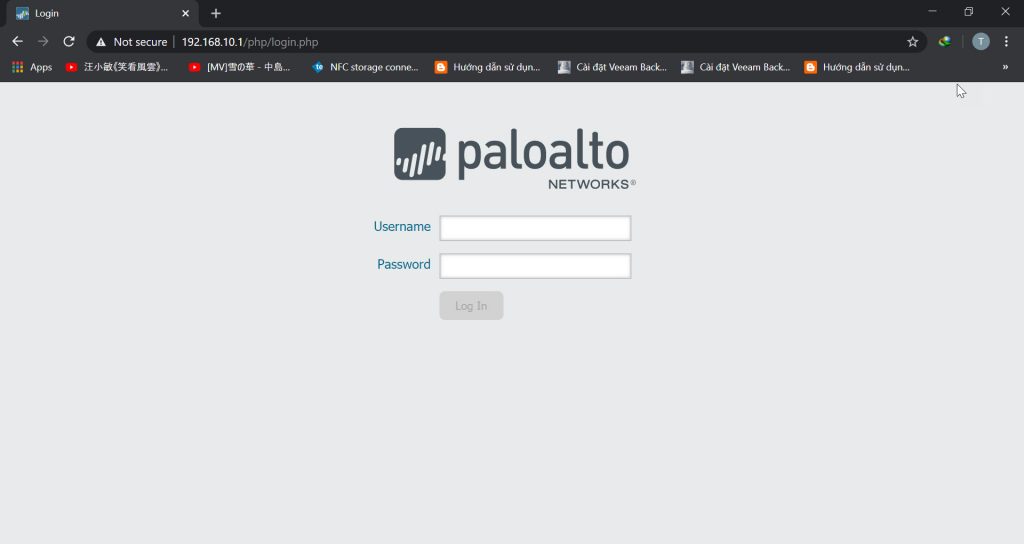
- Open a new tab in your browser and enter the link https://192.168.10.1 to access the admin page of the Palo Alto firewall.
Leave a Reply