
1. Purpose of the article
This article will guide you how to configure PPPoE dialing on the Palo Alto firewall device and configure the necessary policies to allow users inside the intranet to have internet access.
2. Network diagram, configuration scenarios and steps to configure.
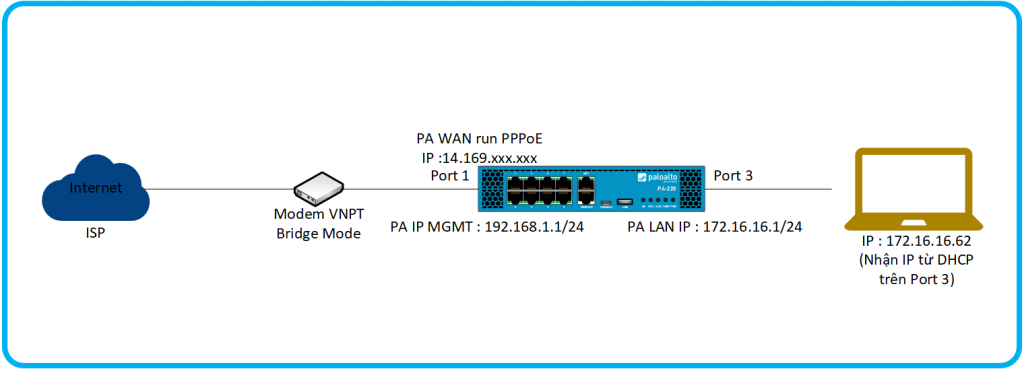
2.1 Network diagram
2.2 Scenario
As in the above network diagram we have the following configuration situation :
- Initially we have an internet connection with dynamic IP and it is being dialed PPPoE by the VNPT modem.
- Our task in this article is that we will connect the Palo Alto device to the system and perform a PPPoE dial-up instead of the VNPT modem.
2.3 What to do ?
- Configure Bridge mode on VNPT modem.
- Connect to the Palo Alto firewall admin page.
- Create zone.
- Configure PPPoE on Palo Alto.
- Configure LAN port.
- Create Virtual Router.
- Configure DHCP Server.
- Create a NAT Policy.
- Create a Security Policy.
- Result.
3. Configuration
3.1 Configure Brigde mode on VNPT modem
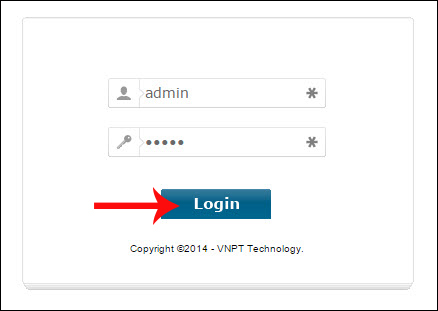
First, you access Gpon modem according to the IP address of VNPT modem. Then access your account information and click Login.
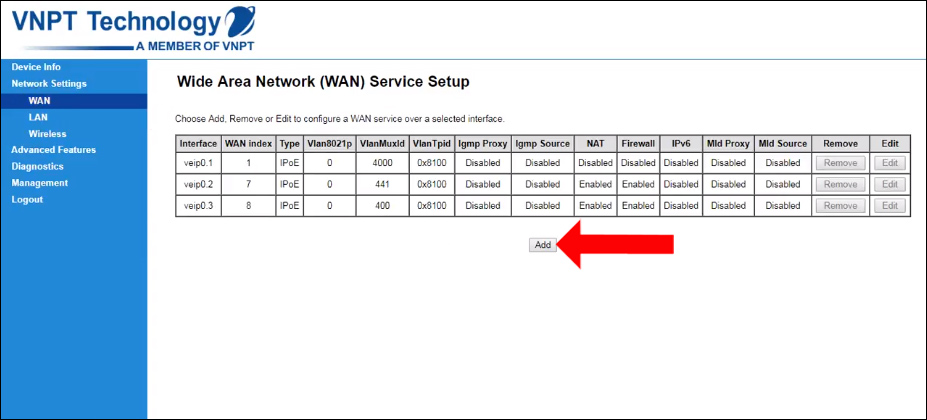
Next, click on Network Settings and then click on the WAN item. Look to the right, click on Add (If you see that the PPPoE configuration is still present because the operator has configured it before, you need to delete it).
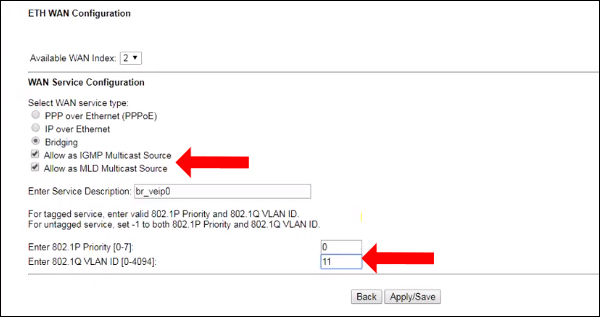
Switch to the new interface and select the Bridging mode. Looking below the VLAN section will enter the default Gpon modem as 11. Click the Apply / Save button to save.
Thus the modem has switched to Bridge mode.
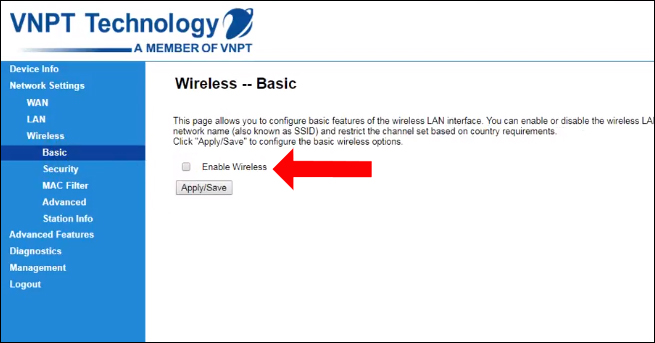
Next we need to turn off WiFi and DHCP. Click on the LAN section and then select Disable DHCP Server to disable DHCP. To turn off WiFi click on the Wireless section, select Basic and then uncheck Enable Wireless then Apply.
After completing the configuration please restart the VNPT modem so that it will run the new configuration.
After booting, we connect port lan on VNPT modem to port 1 on Palo Alto with a network cable.
3.2 Connect to the Palo Alto firewall admin page
- We will connect to the firewall admin page using a network cable connecting the computer to the MGMT port of the Palo Alto firewall.
- Open your browser and access it via the link https://192.168.1.1. The default Palo Alto firewall account and password is admin – admin.
3.3 Create zone
- We will create 2 zones, WAN and LAN.
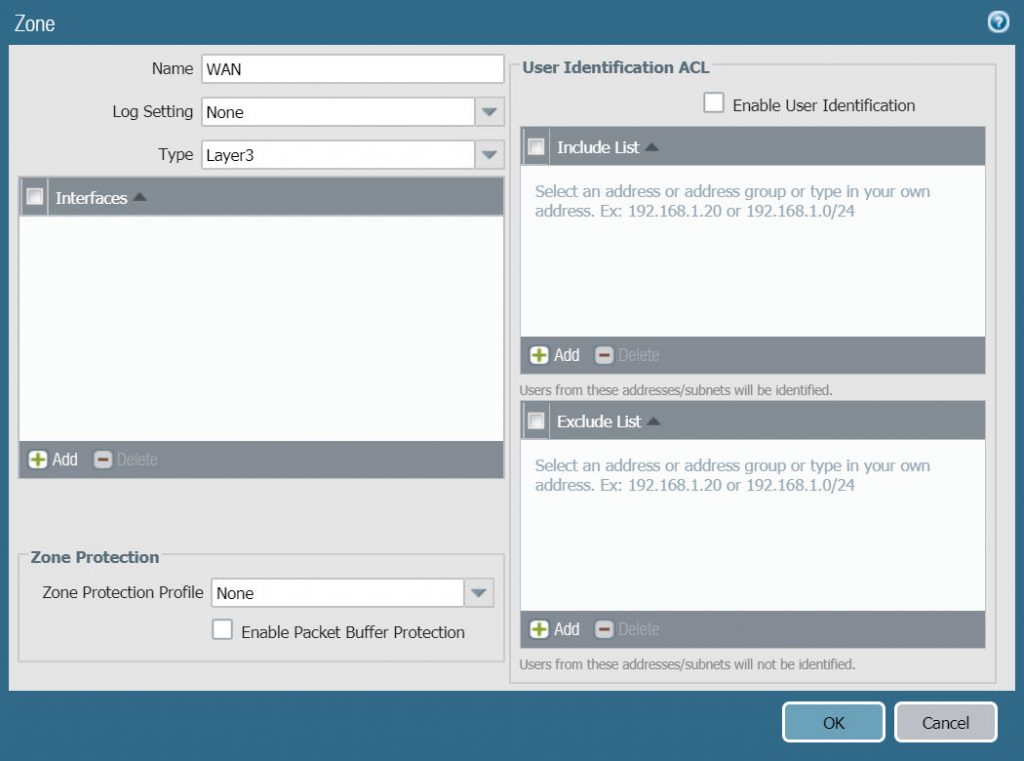
- To create a WAN zone go to Network> Zones> click Add, enter the following information :
- Name : WAN
- Type : Layer 3
- Click OK to save.
- Similarly, click Add to create a zone LAN with the following parameters :
- Name : LAN
- Type : Layer 3
- Click OK to save.

3.4 Configure PPPoE on Palo Alto
- We need to prepare the PPPoE account and password that our carrier gives us before configuring
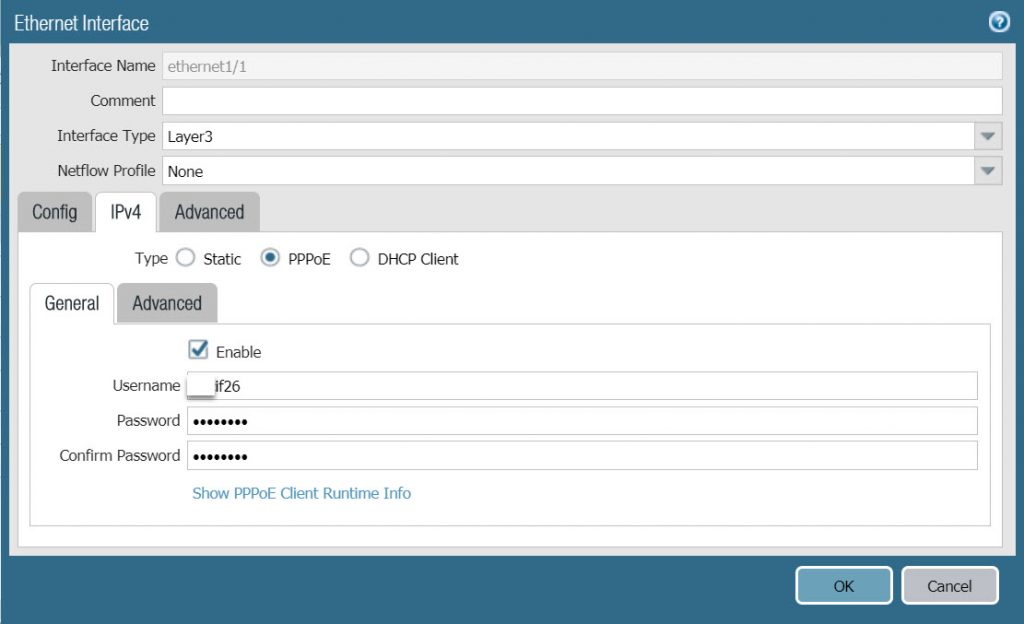
- To configure PPPoE on ethernet1 / 1, go to Network> Interfaces> click on the network port name
- On the Config tab, configure the parameters as follows :
- Interface type : select Layer 3
- Security Zone : select WAN

- In the IPv4 tab, configure the following parameters :
- Type : select PPPoE
- Check Enable.
- Enter PPPoE account and password in 3 boxes Username, Password and Confirn Password.
- Click OK to Save.
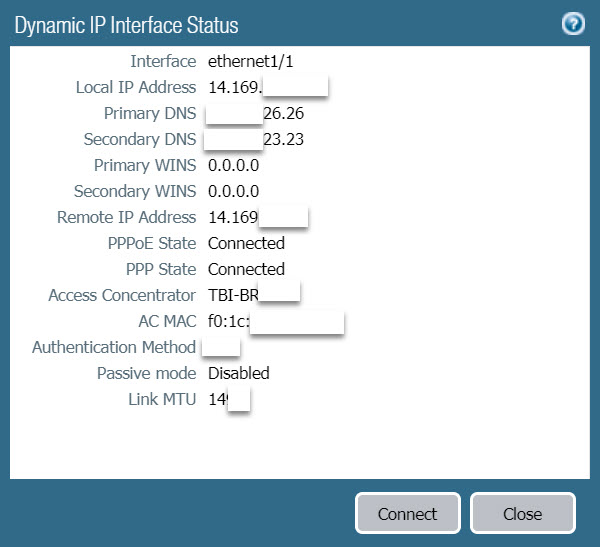
- To check whether the PPPoE configuration was successful or not, click on Dymanic-PPPoE at the network port where we configured PPPoE.
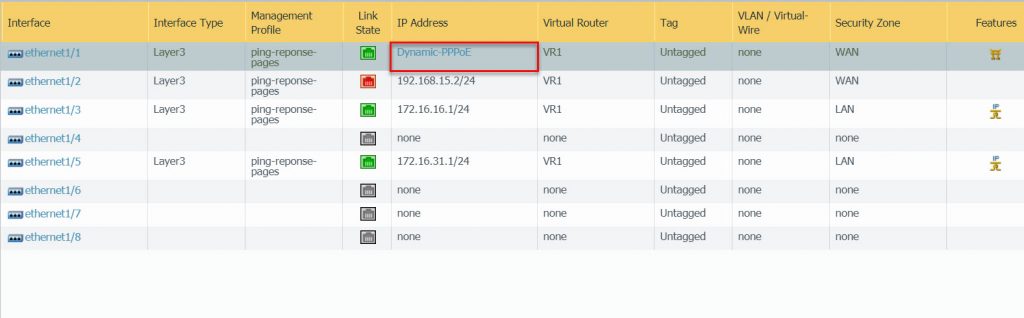
- The results are as follows :
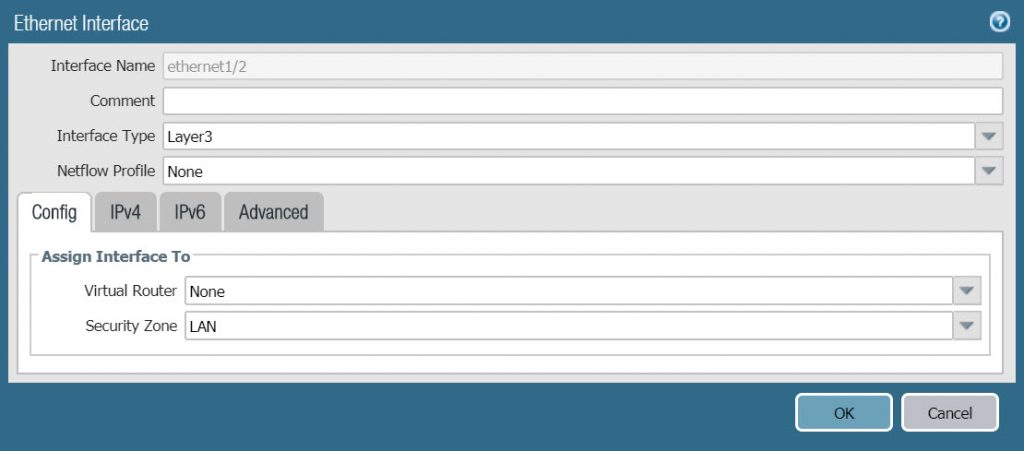
3.5 Create LAN port
- To configure LAN port ethernet1 / 2 click on the name of the port.
- In tab Config configure the following parameters :
- Interface Type : Layer 3
- Security Zone : LAN
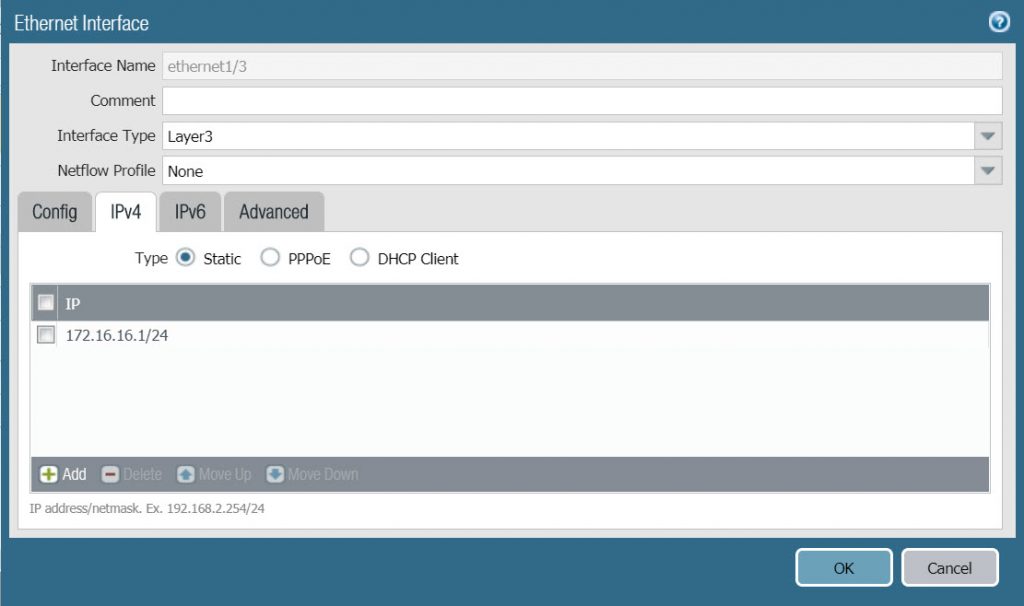
- In the IPv4 tab we configure the following parameters :
- Type : Static
- Click Add and enter the IP address 172.16.16.1/24
- Click OK to save.
3.6 Create Virtual Router
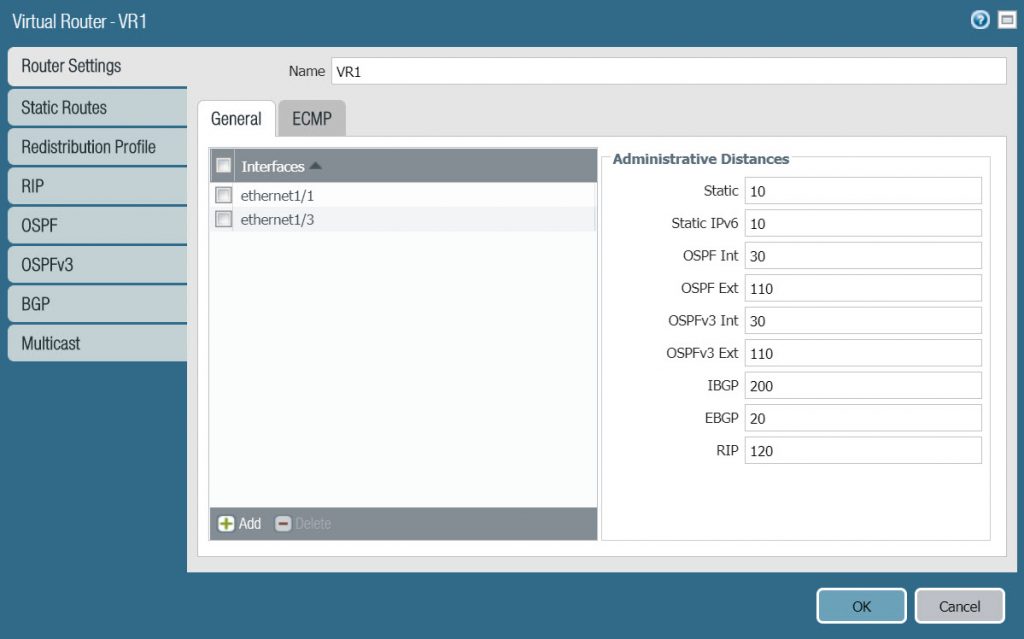
- To create a Virtual Router go to Network> Virtual Router> Click Add.
- In the Router Settings tab configure the following parameters :
- Name : VR1
- In the General panel click Add and add 2 ports ethernet1 / 1 and Ethernet1 / 3.
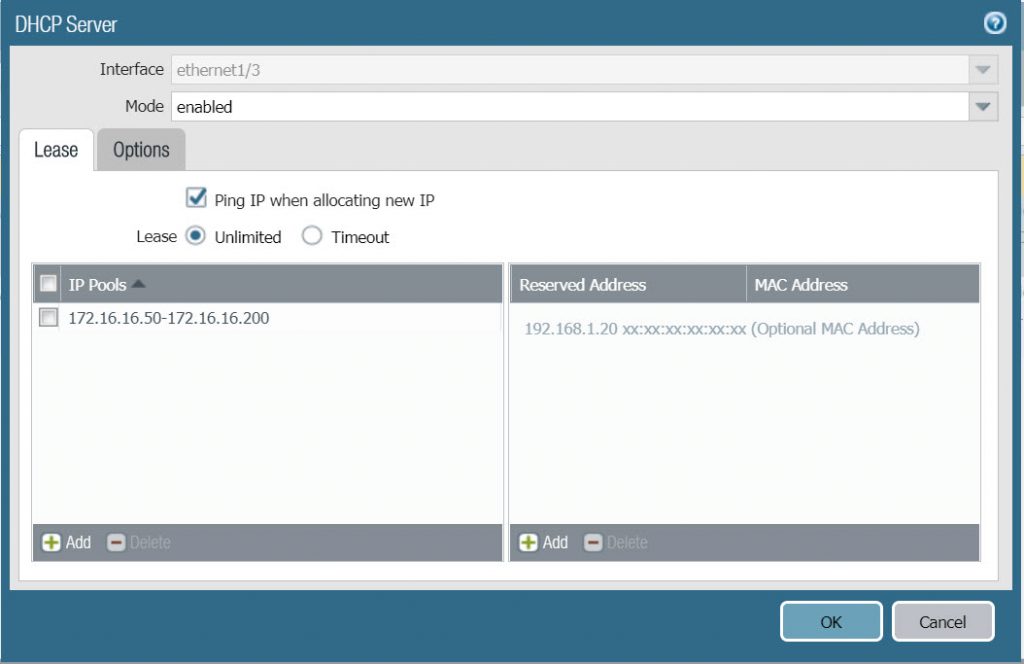
3.7 Configure DHCP Server
- To configure DHCP Server go to Network> DHCP> click Add.
- In the Lease tab configure with the following parameters :
- Interface : select ethernet1/3
- Mode : enable
- On the IP Pools table click Add and enter the IP range that will be assigned as 172.16.16.50-172.16.16.200.
- In tab Options configure with the following parameters :
- Gateway : 172.16.16.1
- Subnet Mask : 255.255.255.0
- Primary DNS : 8.8.8.8
- Secondary DNS : 8.8.4.4
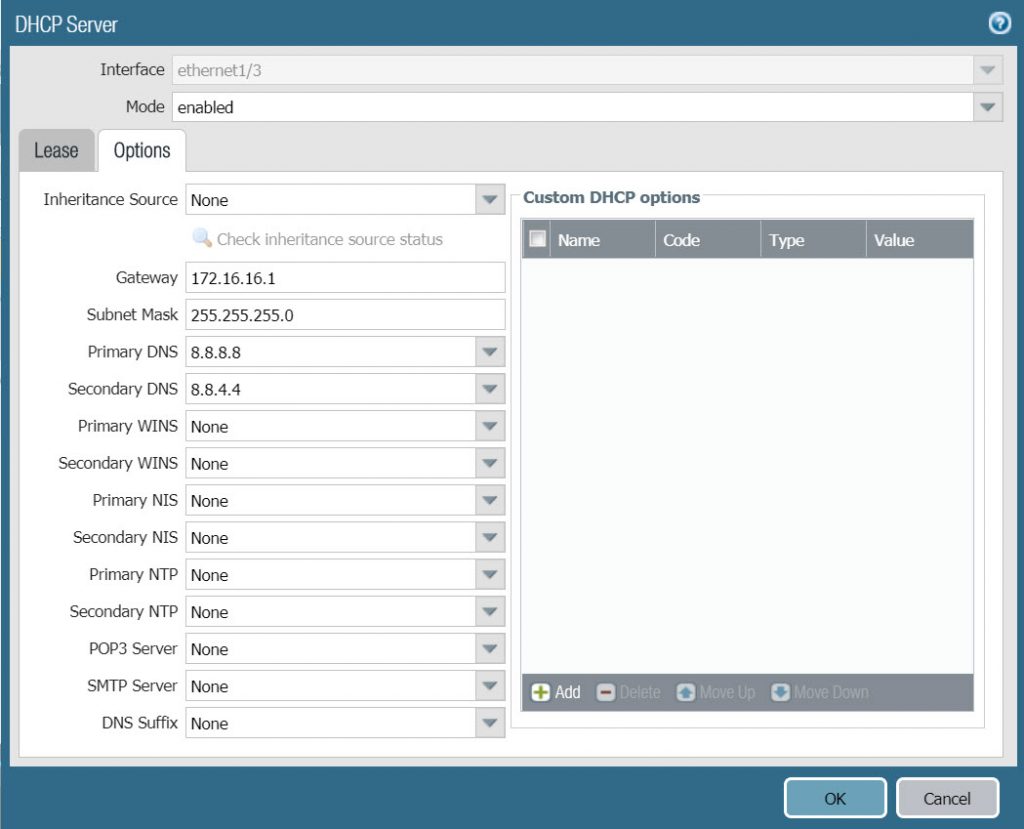
- Click OK to save.
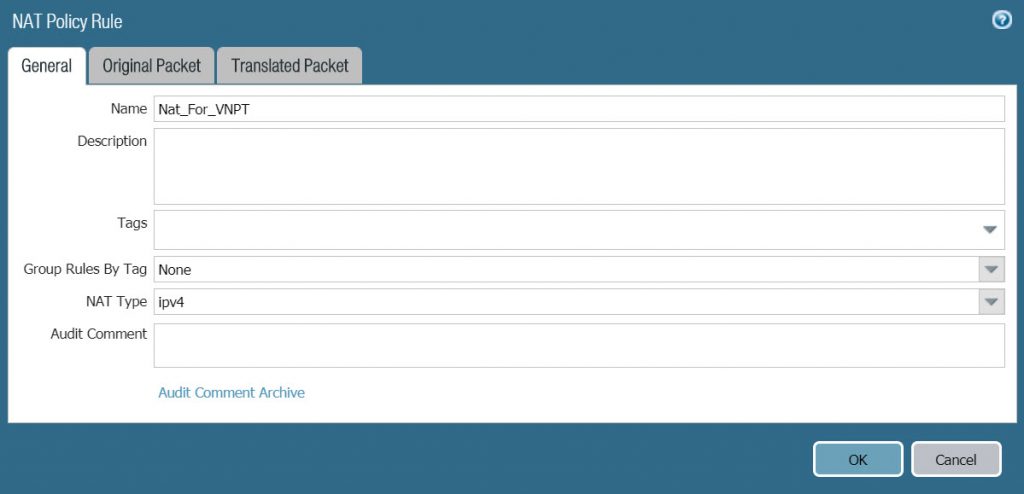
3.8 Create a NAT Policy
- To create a NAT Policy go to Policies> NAT> Click Add.
- In the General tab configure the following parameters :
- Name : Nat-For_VNPT
- NAT Type : ipv4
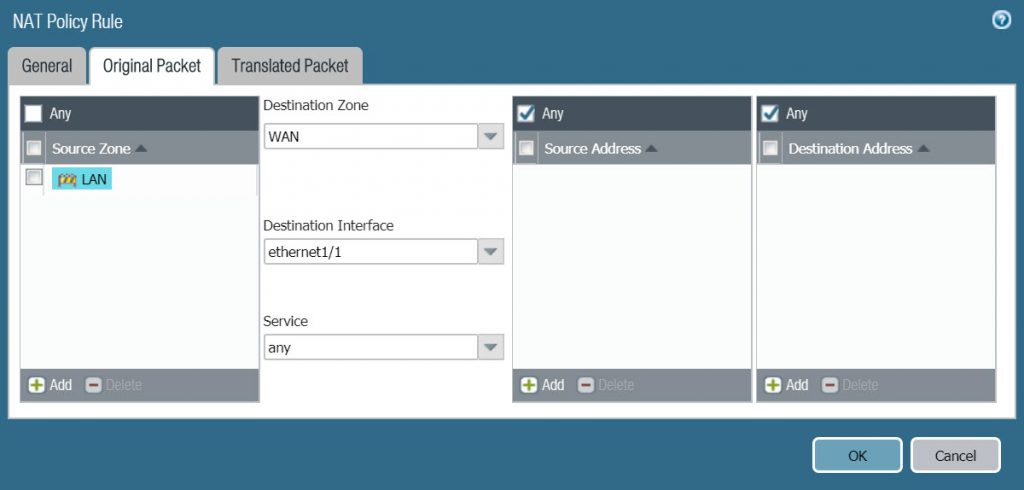
- In the tab Original Packet configure according to the following parameters :
- Source Zone : LAN
- Destination Zone : WAN
- Destination Interface : ethernet 1/1
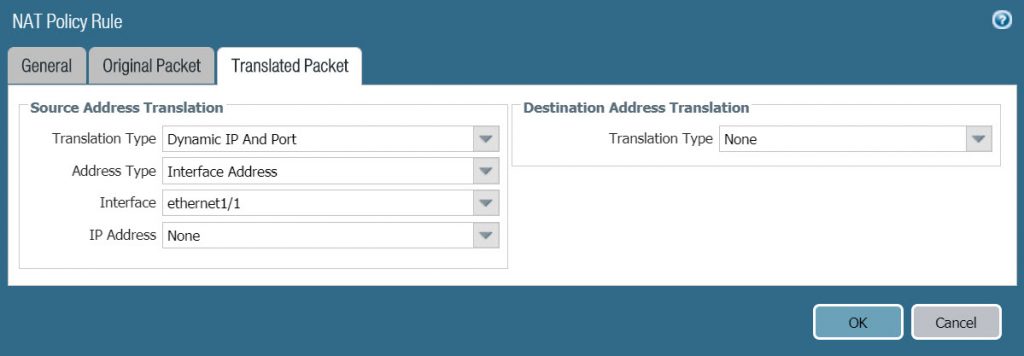
- In the tab Translated Packet> Source Address Translation configure the following parameters :
- Translation Type : Dynamic IP and Port
- Address Type : Interface Address
- Interface : ethernet1/1
- IP Address : None
3.8 Create a Security Policy Rule
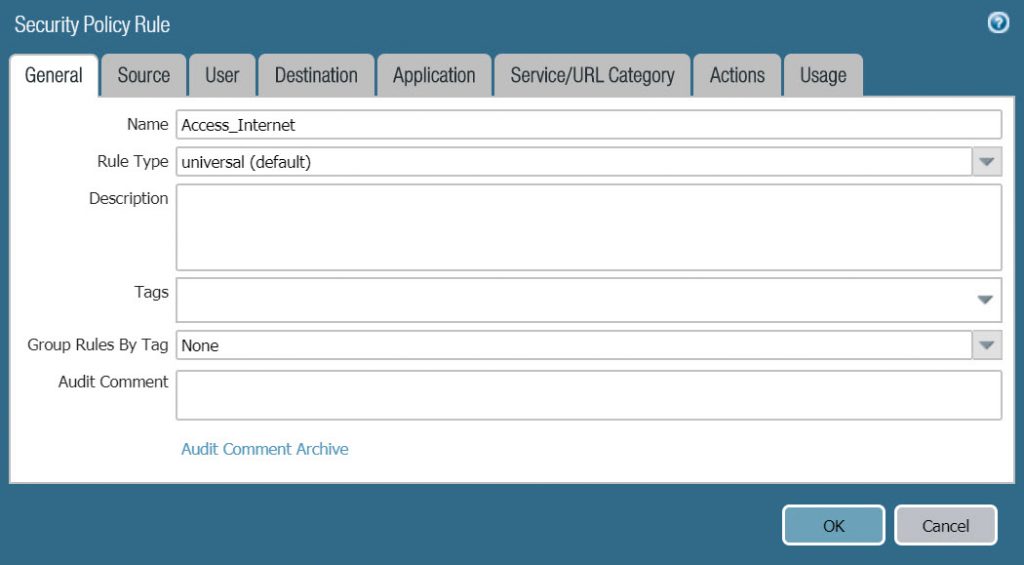
- To create Go to Policies> Security> Click Add.
- In the General tab configure the following parameters :
- Name : Access_Internet
- Rule Type : universal (default)
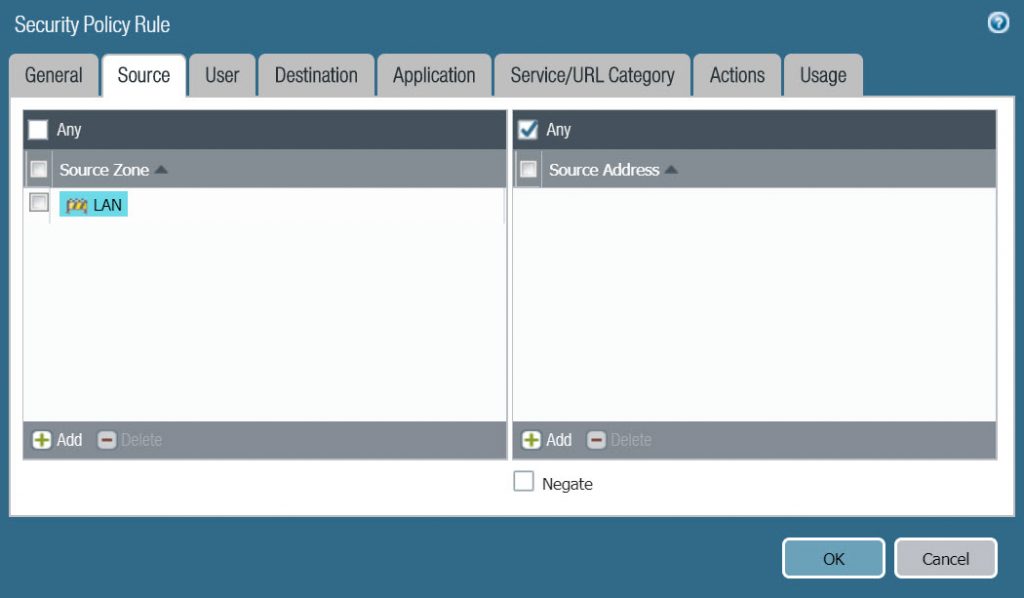
- On the Source tab, select LAN in Source Zone.
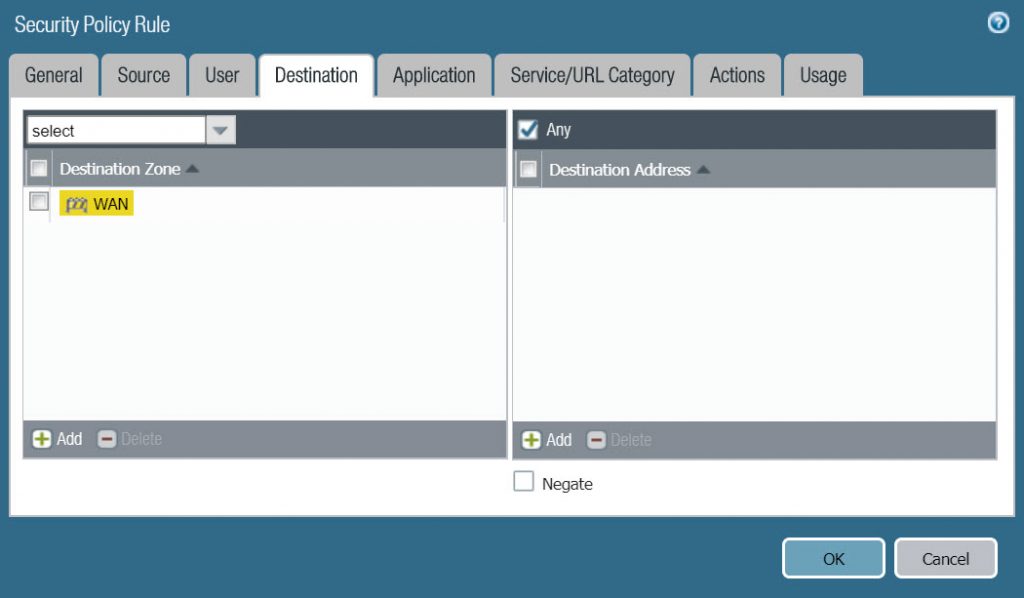
- Under the Destination tab, select WAN in Destinatoin Zone.
- In the Application tab, select Any.

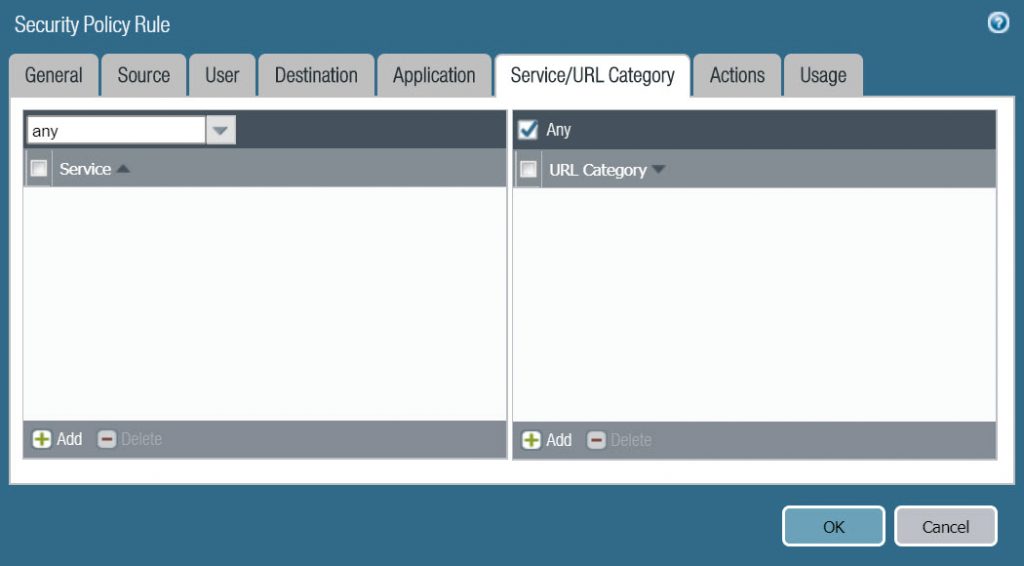
- Under the tab Service / URL Category select any.
- In the Action tab configure as follows :
- Action Setting : Allow
- Log Setting : Log at Session End.
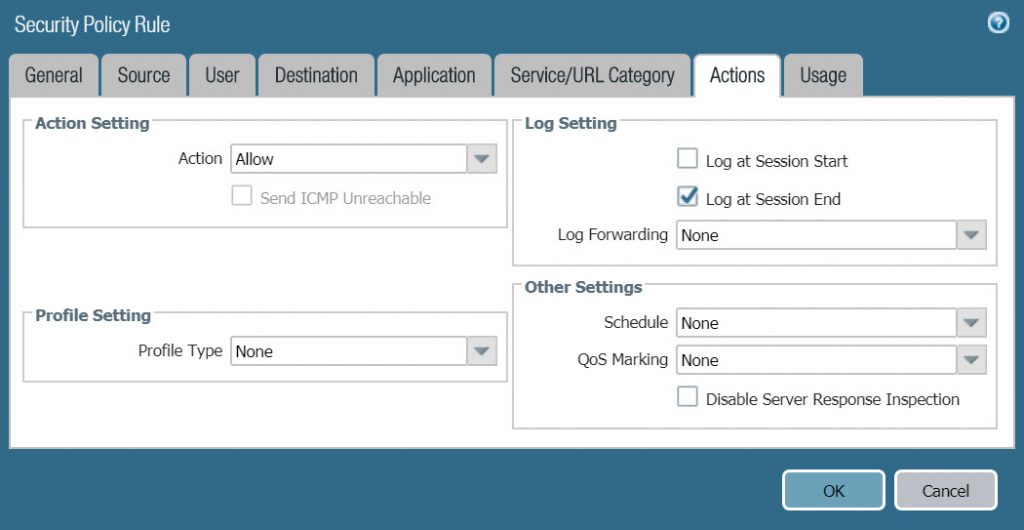
- Click OK tosave.
3.9 Result
- After completing the configuration using a network cable connect the computer to the ethernet1 / 3 port on the Palo Alto firewall.
- Launch the Command Line application and type ipconfig to check if the machine is receiving IP from the DHCP Server is configured on ethernet1 / 3 port or not.

- Open a browser and try to access the google page.
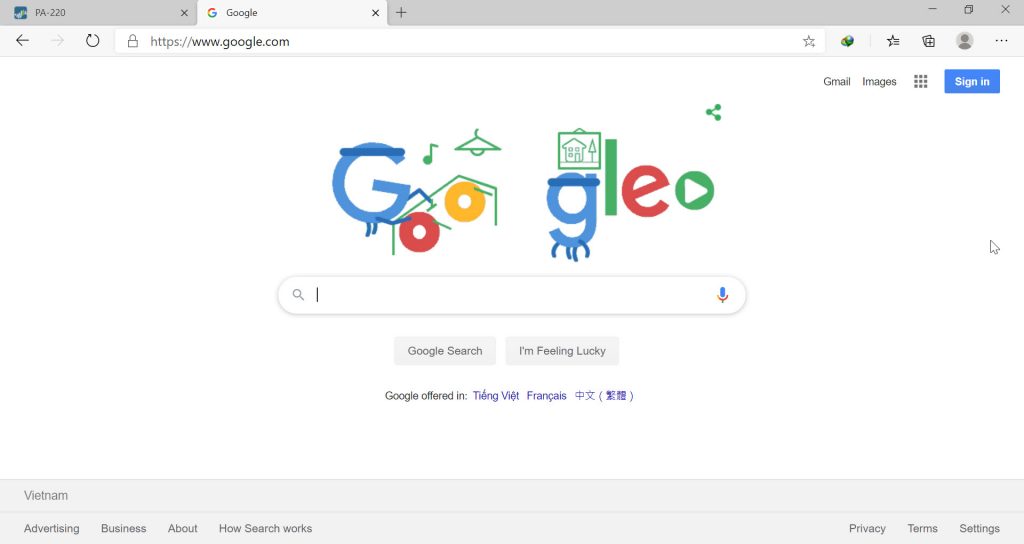
So we have successfully configured PPPoE as well as allowing users to access the internet on Palo Alto.
hi.
prevously you have all palo-alto blogs
now its not seeing anything except 1 blog