
GLPI is a free and open-source web-based help desk application that allows you to create, track trouble tickets and work orders. It also allows you to create an inventory of equipment for your company (computer, software, printers…) and checkout reservations for that equipment.
GLPI has the following features.
– Inventory of computers, peripherals, network printers, etc.
– Management of issues on many environments through creation of tickets, management of tickets, assignment, tickets scheduling, etc.
– Licenses management (ITIL compliant).
– Assignment of equipment by geographical area to users and groups.
– Management of business and financial information (purchase, guarantee and extension, damping).
– Equipment status management.
– Management of applications for assistance of all types of equipment inventory.
– Interface to allow the user to file a support ticket.
– Business management, contracts, documents related to inventory items.
– Equipment booking.
– FAQ Management.
– Report generator for hardware, network or interventions.
– Multi-language support including 41 languages available.
Moreover, GLPI has many plugins with added features.
Install GLPI on Debian / Ubuntu / Linux Mint
First you need to make sure you have Debian or Ubuntu is installed and updated after that you will need to install six pieces of software:
Install Apache web server
|
1 |
# sudo apt-get install apache2 |
Install MySQL database server version 5.5
|
1 |
# sudo apt-get install mysql-server-5.5 |
Now we have to create a database for GLPI. To do so, log in to your MySQL server using command:
|
1 |
# mysql -u root -p |
Now create a database called ‘glpidb’ and database user called ‘glpiuser’ with password ‘glpiuserpwd’ as described below.
|
1 2 3 4 5 6 7 8 9 10 11 12 13 |
Type 'help;' or '\h' for help. Type '\c' to clear the current input statement. mysql> create database glpidb; Query OK, 1 row affected (0.00 sec) mysql> GRANT ALL ON glpidb.* TO glpiuser@localhost IDENTIFIED BY 'glpiuserpwd'; Query OK, 0 rows affected (0.00 sec) mysql> flush privileges; Query OK, 0 rows affected (0.00 sec) mysql> exit Bye |
Install PHP version 5
|
1 |
# sudo apt-get install php5 |
Install MySQL module for PHP
|
1 |
# sudo apt-get install php5-mysql |
Install JSON module for PHP
|
1 |
# sudo apt-get install php5-json |
You can download the latest GLPI software on http://www.glpi-project.org to your downloads folder.
Use this command to unpack the GLPI files:
|
1 |
# tar -xzvf glpiVERSION.tar.gz |
(Note that the actual name of the file will change depending upon what version of GLPI you have downloaded – be sure to use the correct file name.)
Make a directory in /var/www for the GLPI files:
|
1 |
# sudo mkdir /var/www/glpi |
Finally, move the GLPI files over to the /var/www/glpi directory. (In this command, I’ll assume you unpacked the GLPI files to your downloads directory; you will have to adjust the command if you unpacked them in a different directory.)
sudo cp -r ~/downloads/glpi/* /var/www/glpi
Set Read/Write permissions of the following directories.
|
1 2 |
# chmod -R 777 /var/www/glpi/files/ # chmod -R 777 /var/www/glpi/config/ |
Begin Installation
The rest of the installation is web based and pretty easy. Point your web browser with URL http://ip-address/glpi or http://domain-name/glpi and follow the onscreen instructions.
You should see the following screen. Select your language and click Ok.
And also you have to remove the install/install.php file for security reasons.
|
1 |
# rm -fr /var/www/glpi/install/install.php |
If you made any mistakes or just forgot the password for the administrative account, you can re-run the above setup by deleting the following config/config.php file.
After completing your installation change the permission of the config/config_db.php file to avoid any misconfiguration by users.
|
1 |
# chmod 400 /var/www/glpi/config/config_db.php |
Now start using GLPI asset management system by navigating to http://ip-address/glpi.
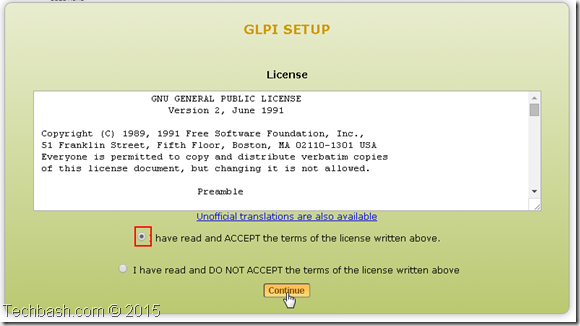
Accept the License agreement and click Ok.
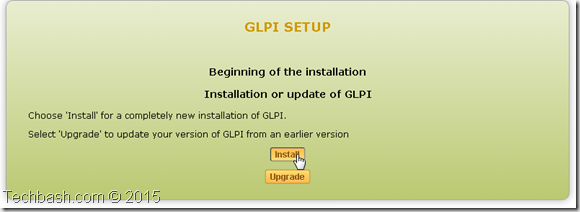
If it is a new installation click Install button, else click Upgrade button to upgrade from old version to most recent new version. I want to install a fresh version of GLPI, hence i clicked Install button.
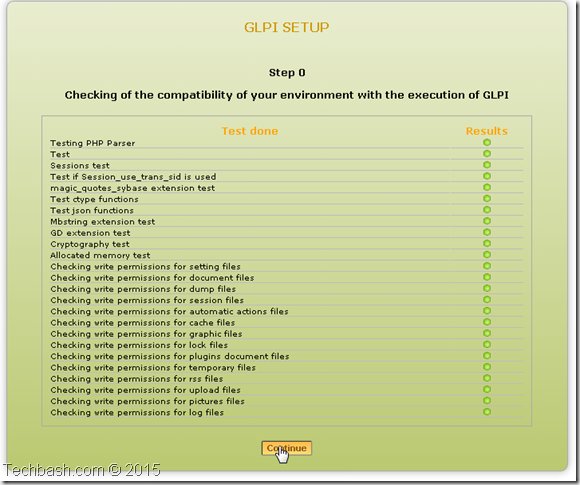
If all seems well, you should see the following screen. If there are any errors, check for the file permissions and start over the installation again.
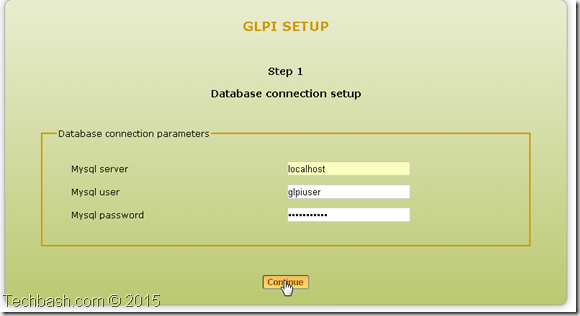
Enter the MySQL credentials such as hostname, user and password and click Continue.
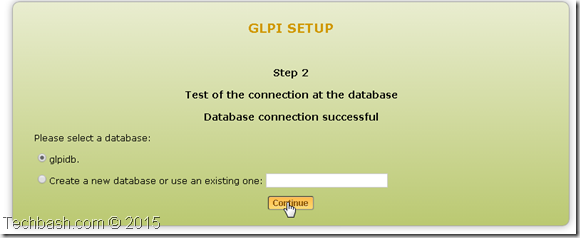
If you have already created a MySQL database it should have listed in the next screen as shown below, else you have to create a new one by clicking on the link Create new database. I have already created a database called ‘glpidb’, hence i selected it.
Click Continue.
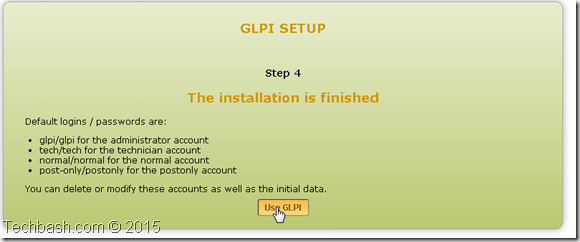
Congratulations! We have installed GLPI on our server successfully.
The default user accounts and their passwords will be shown in the above window. However i have listed them below for the sake of clarity.
– glpi/glpi for the administrator account
– tech/tech for the technician account
– normal/normal for the normal account
– post-only/postonly for the postonly account
Please note them. You can change them later.
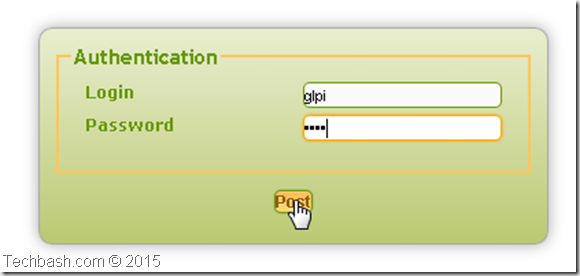
Click Use GLPI to proceed. Let us log in to GLPI administrative Dashboard. The administrative user name is glpi and password is also glpi. Enter them and click Post.
This is how my Administrative dashboard looks.
At the first log in it will show some precautions that be made before using GLPI further.
First you above to change the default users passwords for security reasons. To do that. Go to Administration -> Users -> glpi and input your new password in the password column.
And also you have to remove the install/install.php file for security reasons.
|
1 |
# rm -fr /var/www/glpi/install/install.php |
If you made any mistakes or just forgot the password for the administrative account, you can re-run the above setup by deleting the following config/config.php file.
After completing your installation change the permission of the config/config_db.php file to avoid any misconfiguration by users.
|
1 |
# chmod 400 /var/www/glpi/config/config_db.php |
Now start using GLPI asset management system by navigating to http://ip-address/glpi.
Usage of GLPI is not that difficult. Just go-through every menus and explore things. If you still want a help documentation, i suggest you to read the Official wiki page.
References: GLPI Project



Ist must be
sudo cp -r ~/Downloads/glpi/* /var/www/glpi at copying files instead of
sudo cp -r ~/downloads/glip/* /var/www/glpi
Thanks, we’ve just updated it.
Changing chmod must be execute as sudo:
# sudo chmod -R 777 /var/www/glpi/files/
# sudo chmod -R 777 /var/www/glpi/config/
On Ubuntu 14.04 you have to copy everything to
sudo cp -r ~/downloads/glip/* /var/www/HTML/glpi
instead of sudo cp -r ~/downloads/glip/* /var/www/glpi
You have to add extension=mysqli.so to your php.ini
(/etc/php5/apache2 on Ubuntu 14.04)
and install php-gd
sudo apt-get install php5-gd
Then restart apache (sudo service apache2 restart)
You’re right. thanks for the information. That will helpful for visitors.