
Overview
- This article will introduce the basic configuration of IPS in Sophos XG Firewall run version 18 firmware.
What does it have ?
1. DoS Attacks
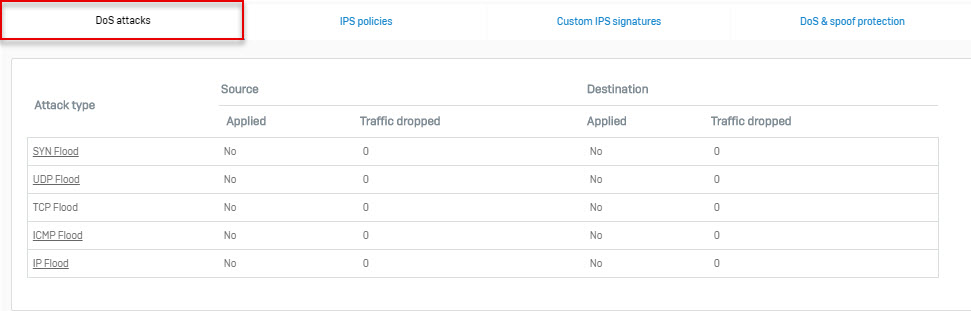
Attack Type
- Displays the attack type: SYN Flood, UDP Flood, TCP Flood, ICMP Flood and IP Flood.
Source
- Displays whether source packet control is applied or not. If applied, it indicates the number of packets dropped.
Destination
- Displays whether destination packet control is applied or not. If applied, it indicates the number of packets dropped.
Click the name of the attack type you want to view to get real time updates on flooding.
2. IPS Policies
The device is a real time Intrusion Prevention System (IPS) system that protects your network from known and unknown attacks by worms and viruses, hackers and other Internet risks.
The device at the perimeter of your network analyzes entire traffic and prevents attacks from reaching your network. Whether it is a worm, a suspicious web request, a hacker targeting your mail server or any other attack – it simply does not get through.
- Intrusion Prevention System module is a subscription module that needs to be subscribed before use.
- You can also view and manage the IPS status on the Monitor & Analyze > Diagnostics > Services page.
IPS consists of a signature engine with a predefined set of signatures. Signatures are the patterns that are known to be harmful. IPS compares traffic to these signatures and responds at a high rate of speed if it finds a match. Signatures included within the device are not editable.
As per your network requirements, device allows you to define multiple policies instead of one global policy, to decrease packet latency and reduce the false positives.
IPS policy allows you to view predefined signatures and customize the intrusion prevention configuration at the category as well as individual signature level. Categories are signatures grouped together based on the application and protocol vulnerabilities.
The device instead of providing only a single policy (global) for managing multiple networks/hosts, allows to tailor policy per network/host i.e. allows to define multiple policies for managing multiple networks/hosts.
To enable the Intrusion Prevention System, apply IPS policy from Security Policies. You can create rule to apply:
- Single policy for all the users/networks
- Different policies for different users/networks or hosts.
As Security Policies control all traffic passing through the device and decide whether to allow or drop the connection, IPS rule will be applied to only that traffic/packet which passes through Firewall.
2.1 Category
Signatures are organized in categories such as DNS, Finger, P2P, DDOS, and others. These signature categories are listed in the policy. You can configure these categories to change the prevention and/or detection settings. To perform Intrusion Prevention, you need to enable IPS services for each category i.e. you will be able to configure attack threats for individual signature only if an IPS service for the category is “Enabled”.
IPS provides six actions for managing attack threats: (action if signature matches)
- Allow Packet – Allows the packet to its intended destination.
- Drop Packet – Drops packets if detects any traffic that matches the signature.
- Disable – Disables the signature, if it detects any traffic that matches the signature.
- Drop Session – Drops the entire session if detects any traffic that matches the signature.
- Reset – Resets entire session if detects any traffic that matches the signature.
- Bypass Session – Allows the entire session if detects any traffic that matches the signature.
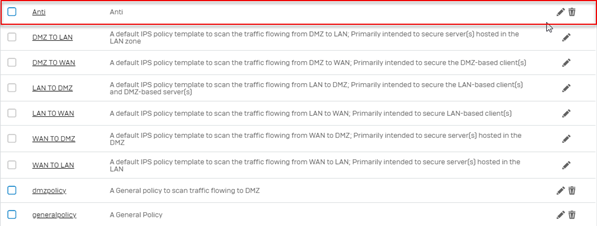
The device provides following pre-defined policies. You can directly use policies 1 to 6 without any modifications while policies 7 to 10 can either be used directly or, can be modified as per your requirements:
- 1. DMZ TO LAN
- 2. DMZ TO WAN
- 3. LAN TO DMZ
- 4. LAN TO WAN
- 5. WAN TO DMZ
- 6. WAN TO LAN
- 7. generalpolicy
- 8. lantowan strict policy
- 9. lantowan general policy
- 10. dmzpolicy
2.2 Create an IPS policies
Go to Protect > Intrusion Prevention > IPS Policies and click Add.
Specify the following:
Name
- Enter a unique name for the IPS policy.
Description
- Enter a description for the IPS policy.
Clone Rules
- Select the IPS policy to be used as a template from the available list.
Available Options:
- generalpolicy
- lantowan_strict
- lantowan_general
- dmzpolicy
- LAN to WAN
- LAN to DMZ
- WAN to DMZ
- WAN to LAN
- DMZ to WAN
- DMZ to LAN
Click Save.
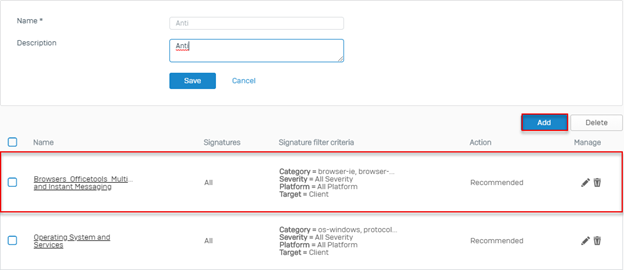
Note : Once the policy is created, policy rules can be added to take appropriate action for signatures in the policy. Define a rule to configure an action to be taken when the matching traffic pattern is found. If the rules are already added, a list of rules is displayed along with its details like signature filtering criteria, action.
2.3 Edit IPS Policies
To edit IPS policies go to Protect > Intrusion Prevention > IPS Policies.
Click on the pencil icon to the right of the IPS policies we just created.
After click Edit list of signatures appear, click pencil icon to Edit the signature, click Trash icon to Delete Signature out of list and click Add to Add new signature.
Note: The rules available in the list are clone from the LAN TO WAN Policies that we selected earlier so editing them will not affect the original LAN TO WAN Policies.
3. Custom IPS Signatures
Custom IPS Patterns provide the flexibility to customize IPS for diverse network environments. Predefined IPS patterns included in the device cover common attacks while Custom IPS Patterns protect your network from uncommon attacks that are due to the use of proprietary server, custom protocol, or specialized applications used in the corporate network.
Administrator can create Custom IPS Pattern and configure policies using them. However, the IPS scanning will be effective only if Network Protection module is subscribed.
3.1 Add IPS Pattern
Go to to Protect > Intrusion Prevention > Custom IPS Signatures and click Add.
Enter the IPS Signature details.
Name
- Enter a name to identify the Custom IPS Signature.
Protocol
Select IPS protocol from the list.
Available Options:
- TCP
- UDP
- ICMP
- ALL
Custom Rule
Specify IPS Signature definition.
Signature definition must begin with a keyword followed by the value enclosed between the double quotes and must end with semicolon (;)
Format: Keyword: “value”;
For example, content: “USER JOHN”;
If traffic with the content USER JOHN is detected, action defined in the policy will be taken.
Refer to Appendix B – IPS – Custom IPS Pattern Syntax for more details on creating IPS Pattern.
Severity
Select the level of severity from the available options.
- Critical
- Major
- Moderate
- Minor
- Warning
Recommended Action
Specify action to be taken on the selected policy when matching pattern is found.
Available Actions:
- Allow Packet – Check each packet before taking action.
- Drop Packet – Drop packets.
- Drop Session – Terminate entire session instead of scanning all the session packets to save resources and avoid getting high number of alerts.
- Reset – Send TCP reset packet to the originator.
- Bypass Session – Scan initial packets only. If the initial packets match the pattern then the rest of the session packets are not scanned and the traffic is allowed to pass.
In all the cases, device generates the log and alerts the Network Administrator.
Click Save.
Leave a Reply